D3d11.dll
Содержание:
- Remarks
- DLL Yükleme
- Force the sample count to create a rasterizer state
- Build instructions
- Parameters
- Вычисление шейдера
- Обновляем драйвера видеоадаптера
- Background
- Example Usage
- Способ 1: Загрузка d3dx11_43.dll
- Cleaning up
- Shader tracing and compiler enhancements
- d3d11.dll скачать для Windows 7, 8, 10. Как исправить ошибку d3d11.dll.
- Решаем проблему
- Initializing D3D11On12
Remarks
A view is a format-specific way to look at the data in a resource. The view determines what data to look at, and how it is cast when read.
When viewing a resource, the resource-view description must specify a typed format, that is compatible with the resource format. So that means that you cannot create a resource-view description using any format with _TYPELESS in the name. You can however view a typeless resource by specifying a typed format for the view. For example, a DXGI_FORMAT_R32G32B32_TYPELESS resource can be viewed with one of these typed formats: DXGI_FORMAT_R32G32B32_FLOAT, DXGI_FORMAT_R32G32B32_UINT, and DXGI_FORMAT_R32G32B32_SINT, since these typed formats are compatible with the typeless resource.
Create a shader-resource-view description by calling ID3D11Device::CreateShaderResourceView. To view a shader-resource-view description, call ID3D11ShaderResourceView::GetDesc.
DLL Yükleme
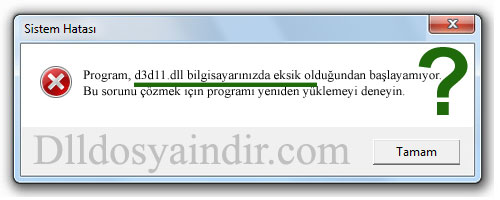 d3d11.dll Eksik
- İndirdiğiniz DLL dosyasını hata aldığınız bilgisayarınızda sıkıştırılmış halden Winrar yardımı ile açınız. Klasör içerisinde bulunan tek DLL dosyasını Mouse ile sağa tıklayarak kopyalayınız.
- Kopyalamış olduğunuz DLL dosyasını Windows 32 bit işletim sistemi kullanıyorsanız, C sürücüsü içerisinde Windows içerisinde System32 (C:\Windows\System32) klasörüne yükleyiniz.
- Windows 64 bit işletim sistemi kullanıyorsanız, kopyalamış olduğunuz DLL dosyasını C sürücüsü içerisinde Windows içerisinde SysWOW64 (C:\Windows\SysWOW64) klasörüne ve C sürücüsü içerisinde Windows içerisinde System32 (C:\Windows\System32) klasörüne yükleyiniz.
- Klasör içerisine DLL dosyasını yüklerken dosyanın zaten var olduğuna dair uyarı alırsanız, bilgisayarınızda bulunan DLL dosyası değiştirilmesini isteyerek üzerine yükleyiniz. Bu şekilde bozuk DLL dosyasını yenilemiş olursunuz.
- DLL dosyasını anlatılan şekilde bilgisayarınıza yükledikten sonra bilgisayarınızı tekrar başlatınız. Hata aldığınız oyun veya programı çalıştırınız.
Bazı program veya oyunlarda DLL dosyasını sistem klasörü haricinde hata aldığınız oyun veya programın kurulu olduğu kök dizine (ilk klasör) atmak gerekebiliyor. Sistem klasörüne DLL dosyasını yükler yine DLL uyarısı alırsanız oyun ya da programın kök dizinine DLL dosyasını yükleyiniz.
İşlemleri yaptığınız halde DLL hatası devam ediyorsa, Windows 32 bit için başlat menüsünden çalıştır alanına CMD yazınız, açmadan CMD dosyası üzerinde Mouse ile sağa tıklayarak “Yönetici olarak çalıştır” menüsüne tıklayınız. Açılan komut penceresine “RegSvr32 C:\Windows\System32\d3d11.dll” komutunu girerek Enter tuşuna basınız.
Windows 64 bit için yine aynı şekilde “Yönetici olarak çalıştır” menüsüne tıklayarak açılan komut penceresine “RegSvr32 C:\Windows\SysWOW64\d3d11.dll” komutunu girerek Enter tuşuna basınız. Bilgisayarınızı son defa sisteminizin tamamen yenilenmesi için tekrar başlatınız. CMD komut sistemi nasıl çalışır ve komutlar neler öğrenmek isterseniz DLL Dosyası için CMD Komutları sayfasına gidebilirsiniz.
Yukarıda bahsedilen yöntemleri uygulayarak, Windows işletim sisteminizi yeniden başlattıktan sonra tekrar sayfa içerisinde yaptığınız işlemlerin doğruluğunu kontrol etmenizi tavsiye ediyoruz.
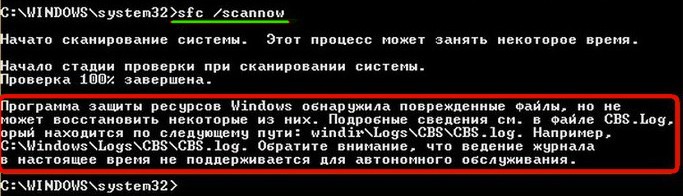
Windows 32 bit ve Windows 64 bit için CMD komut penceresine sfc /scannow komutunu girerseniz, bilgisayarınızda bulunan tüm DLL dosyalarını onarırsınız.
DLL Kategorisi: D ile Başlayan DLL Dosyaları
Force the sample count to create a rasterizer state
Direct3D 11.1 lets you specify a force sample count when you create a rasterizer state.
This Direct3D 11.1 feature consists of the following API.
ID3D11Device1::CreateRasterizerState1
Note
If you want to render with the sample count forced to 1 or greater, you must follow these guidelines:
- Don’t bind depth-stencil views.
- Disable depth testing.
- Ensure the shader doesn’t output depth.
- If you have any render-target views bound (D3D11_BIND_RENDER_TARGET) and you forced the sample count to greater than 1, ensure that every render target has only a single sample.
- Don’t operate the shader at sample frequency. Therefore, ID3D11ShaderReflection::IsSampleFrequencyShader returns FALSE.
Otherwise, rendering behavior is undefined. For info about how to configure depth-stencil, see Configuring Depth-Stencil Functionality.
Build instructions
Building DLLs
The simple way
Inside the DXVK directory, run:
This will create a folder in , which contains both 32-bit and 64-bit versions of DXVK, which can be set up in the same way as the release versions as noted above.
In order to preserve the build directories for development, pass to the script. This option implies . After making changes to the source code, you can then do the following to rebuild DXVK:
Compiling manually
The D3D9, D3D10, D3D11 and DXGI DLLs will be located in . Setup has to be done manually in this case.
Notes on Vulkan drivers
Before reporting an issue, please check the Wiki page on the current driver status and make sure you run a recent enough driver version for your hardware.
Online multi-player games
Manipulation of Direct3D libraries in multi-player games may be considered cheating and can get your account banned. This may also apply to single-player games with an embedded or dedicated multiplayer portion. Use at your own risk.
HUD
The environment variable controls a HUD which can display the framerate and some stat counters. It accepts a comma-separated list of the following options:
- : Displays the name of the GPU and the driver version.
- : Shows the current frame rate.
- : Shows a frame time graph.
- : Shows the number of command buffers submitted per frame.
- : Shows the number of draw calls and render passes per frame.
- : Shows the total number of graphics and compute pipelines.
- : Shows the amount of device memory allocated and used.
- : Shows estimated GPU load. May be inaccurate.
- : Shows DXVK version.
- : Shows the D3D feature level used by the application.
- : Shows shader compiler activity
- : Shows the current number of sampler pairs used
- : Scales the HUD by a factor of (e.g. )
Additionally, has the same effect as , and enables all available HUD elements.
Device filter
Some applications do not provide a method to select a different GPU. In that case, DXVK can be forced to use a given device:
DXVK_FILTER_DEVICE_NAME=»Device Name» Selects devices with a matching Vulkan device name, which can be retrieved with tools such as vulkaninfo. Matches on substrings, so «VEGA» or «AMD RADV VEGA10» is supported if the full device name is «AMD RADV VEGA10 (LLVM 9.0.0)», for example. If the substring matches more than one device, the first device matched will be used.
Note: If the device filter is configured incorrectly, it may filter out all devices and applications will be unable to create a D3D device.
State cache
DXVK caches pipeline state by default, so that shaders can be recompiled ahead of time on subsequent runs of an application, even if the driver’s own shader cache got invalidated in the meantime. This cache is enabled by default, and generally reduces stuttering.
The following environment variables can be used to control the cache:
- Disables the state cache.
- Specifies a directory where to put the cache files. Defaults to the current working directory of the application.
- Enables Vulkan debug layers. Highly recommended for troubleshooting rendering issues and driver crashes. Requires the Vulkan SDK to be installed on the host system.
- Controls message logging.
- Changes path where log files are stored. Set to to disable log file creation entirely, without disabling logging.
- Sets path to the configuration file.
- Enables use of the VK_EXT_debug_utils extension for translating performance event markers.
Parameters
Type: IDXGIAdapter*
A pointer to the video adapter to use when creating a device. Pass NULL to use the default adapter, which is the first adapter that is enumerated by IDXGIFactory1::EnumAdapters.
Note Do not mix the use of DXGI 1.0 (IDXGIFactory) and DXGI 1.1 (IDXGIFactory1) in an application. Use IDXGIFactory or IDXGIFactory1, but not both in an application.
Type: D3D_DRIVER_TYPE
The D3D_DRIVER_TYPE, which represents the driver type to create.
Type: HMODULE
A handle to a DLL that implements a software rasterizer.
If DriverType is D3D_DRIVER_TYPE_SOFTWARE,
Software must not be NULL. Get the handle by
calling LoadLibrary,
LoadLibraryEx ,
or GetModuleHandle.
Type: UINT
The runtime layers to enable (see D3D11_CREATE_DEVICE_FLAG);
values can be bitwise OR’d together.
Type: const D3D_FEATURE_LEVEL*
A pointer to an array of D3D_FEATURE_LEVELs, which determine the order of feature levels to attempt to create.
If pFeatureLevels is set to NULL,
this function uses the following array of feature levels:
Note If the Direct3D 11.1 runtime is present on the computer and pFeatureLevels is set to NULL, this function won’t create a D3D_FEATURE_LEVEL_11_1 device. To create a D3D_FEATURE_LEVEL_11_1 device, you must explicitly provide a D3D_FEATURE_LEVEL array that includes D3D_FEATURE_LEVEL_11_1. If you provide a D3D_FEATURE_LEVEL array that contains D3D_FEATURE_LEVEL_11_1 on a computer that doesn’t have the Direct3D 11.1 runtime installed, this function immediately fails with E_INVALIDARG.
Type: UINT
The number of elements in pFeatureLevels.
Type: UINT
The SDK version; use D3D11_SDK_VERSION.
Type: ID3D11Device**
Returns the address of a pointer to an ID3D11Device object that represents the device created. If this parameter is NULL, no ID3D11Device will be returned.
Type: D3D_FEATURE_LEVEL*
If successful, returns the first D3D_FEATURE_LEVEL from the pFeatureLevels array which succeeded. Supply NULL as an input if you don’t need to determine which feature level is supported.
Type: ID3D11DeviceContext**
Returns the address of a pointer to an ID3D11DeviceContext object that represents the device context. If this parameter is NULL, no ID3D11DeviceContext will be returned.
Вычисление шейдера
Вычислительный шейдер — это программируемый шейдер, предназначенный для параллельной обработки данных общего назначения. Иными словами, шейдеры вычислений позволяют использовать графический процессор в качестве параллельного процессора общего назначения. Вычисление шейдера похоже на другие программируемые построители текстур (вершина, пиксельные и геометрические), способные получить доступ к входным и выходным данным. Технология вычислений с шейдером также называется технологией DirectCompute. Вычисление шейдера интегрировано в Direct3D и доступно через устройство Direct3D. Он может напрямую обмениваться ресурсами памяти с графическими шейдерами с помощью устройства Direct3D. Однако он не подключен напрямую к другим этапам шейдера.
Шейдер вычислений предназначен для массовых приложений, выполняющих вычисления на интерактивных тарифах, когда затраты на переход между API (и связанным программным стеком) и ЦП занимают слишком много ресурсов.
У шейдера вычислений есть собственный набор состояний. В шейдере вычислений не обязательно наличие принудительного сопоставления 1-1 для входных записей (например, шейдер вершин) или выходных записей (например, шейдер пикселей). Некоторые функции шейдера графики поддерживаются, но другие были удалены, поэтому можно добавлять новые функции для работы с шейдером вычислений.
Для поддержки функций, относящихся к шейдеру вычислений, теперь доступны несколько новых типов ресурсов, таких как буферы чтения и записи, текстуры и структурированные буферы.
Дополнительные сведения см. в разделе Общие сведения о COMPUTE Shader .
Обновляем драйвера видеоадаптера
Обычно при первой инсталляции «дровишек» для AMD или nVidia также устанавливается утилита, которая следит за выходом новых апдейтов и предлагает их скачивать. Но если Вы использовали какой-то «наглый» оптимизатор ПК, то он мог убрать из автозагрузки эти процессы. В итоге, обновления выпускаются, но Вы о них можете не узнать своевременно. Как результат – «железо» не получает должной програмной оптимизации и его производительность занижается.
Я советую брать драйвера исключительно с официальных сайтов разработчиков вашего графического адаптера. Или же используем софт для автопоиска – Iobit Driver Booster. Приложение сделает всю работу за Вас, хотя в бесплатной его версии есть ограничение на скорость скачивания, но это не критично – можно поставить на загрузку и пойти прогуляться на часок.
Вот видеообзор ПО:
Как исправить в PUBG или Fallout 4 ошибку DX11 – мы почти разобрались, но хотелось бы рассказать об еще одном интересном моменте, касающемся дискретного адаптера. Нередко на ноуте имеется не только такой ускоритель графики, но и встроенный в процессор. Но не все модели поддерживают их параллельную работу.
В некоторых случаях ОС автоматически включает более мощное «железо», а встроенный обработчик не использует. Но порой Windows творит чудеса и делает всё наоборот. Как результат – вроде бы и оборудование у Вас не слабое, но почему-то не тянет игры. Что делать в подобных ситуациях?
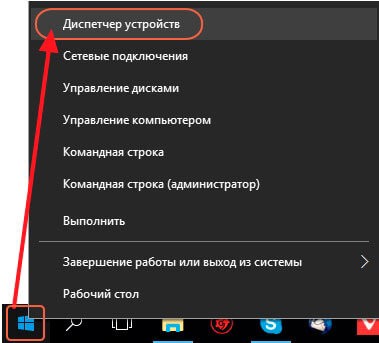
Открываем диспетчер устройств — через панель управления или нажав Win + X , затем выбрав нужный пункт главного меню Виндовс 10:
Когда перечень отобразится, раскрываем категорию «Видеоадаптеры» и отключаем интегрированную карту (чаще всего – это Intel HD):

И напоследок – если у Вас ноутбук, то стоит помнить о режимах электропитания. От батареи ресурс процессора может ограничиваться. А Вы попробуйте включить режим высокой/максимальной производительности:
Background
D3D11On12 works systematically. Each D3D11 API call goes through the typical runtime validation and makes its way to the driver. At the driver layer, the special 11on12 driver records state and issues render operations to D3D12 command lists. These command lists are submitted as necessary (for example, a query or resource might require commands to be flushed) or as requested by Flush. Creating a D3D11 object typically results in the corresponding D3D12 object being created. Some fixed function render operations in D3D11 such as or are not supported in D3D12, and so D3D11On12 emulates them using shaders and additional resources.
For interop, it’s important to understand how D3D11On12 interacts with the D3D12 objects that the app has created and provided. In order to ensure that work happens in the correct order, the D3D11 immediate context must be flushed before additional D3D12 work can be submitted to that queue. It’s also important to ensure that the queue given to D3D11On12 must be drainable at all times. That means that any waits on the queue must eventually be satisfied, even if the D3D11 render thread blocks indefinitely. Be wary not to take a dependency on when D3D11On12 inserts flushes or waits, as this may change with future releases. Additionally, D3D11On12 tracks and manipulates resource states on its own. The only way to ensure coherency of state transitions is to make use of the acquire/release APIs to manipulate the state tracking to match the app’s needs.
Example Usage
Typical usage of D3D11On12 would be to use D2D to render text or images on top of a D3D12 back buffer. See the D3D11On12 sample for example code. Here is a rough outline of the steps to take to do so:
- Create a D3D12 device (D3D12CreateDevice) and a D3D12 swap chain (CreateSwapChain with an ID3D12CommandQueue as an input).
- Create a D3D11On12 device using the D3D12 device and the same command queue as input.
- Retrieve the swap chain back buffers, and create D3D11 wrapped resources for each of them. The input state used should be the last way that D3D12 used it (e.g. RENDER_TARGET) and the output state should be the way that D3D12 will use it after D3D11 has finished (e.g. PRESENT).
- Initialize D2D, and provide the D3D11 wrapped resources to D2D to prepare for rendering.
Then, on each frame, do the following:
- Render into the current swap chain back buffer using a D3D12 command list, and execute it.
- Acquire the current back buffer’s wrapped resource (AcquireWrappedResources).
- Issue D2D rendering commands.
- Release the wrapped resource (ReleaseWrappedResources).
- Flush the D3D11 immediate context.
- Present (IDXGISwapChain1::Present1).
Способ 1: Загрузка d3dx11_43.dll
Библиотеку d3dx11_43.dll можно загрузить на ПК самостоятельно, после чего ее потребуется установить. Процесс установки выполняется посредством копирования файла библиотеки в системную директорию:
- Windows 32 bit: .
- Windows 64 bit: и .
Для установки DLL-файла выполните следующее:
- Перейдите в папку, куда была загружена библиотека d3dx11_43.dll, и скопируйте ее. Сделать это можно как с помощью контекстного меню, вызываемого нажатием правой кнопкой мыши, так и при помощи горячей клавиши Ctrl+C.
Перейдите в системную директорию. Вставьте скопированную библиотеку, используя все то же контекстное меню или горячую клавишу Ctrl+V.
После выполнения этих действий ошибка должна быть исправлена, но в некоторых случаях ОС Windows может не зарегистрировать библиотеку автоматически, и это вам придется выполнять самостоятельно. Для этого откройте «Пуск» > «Командная строка» > «Запуск от имени администратора».
Напишите команду и подтвердите ее клавишей Enter. Если файл был добавлен в две папки, после этого нужно набрать еще одну команду: .
В качестве альтернативы можете попробовать регистрацию при помощи сторонней программы. Об этом мы рассказывали в Способе 1 следующего материала.
Подробнее: Регистрируем файл DLL в ОС Windows
После выполнения всех пунктов инструкции в систему будет помещен отсутствующий файл d3dx11_43.dll, следовательно, ошибка будет устранена.
Cleaning up
In order to release a D3D11On12 wrapped resource, two things need to happen in this order:
- All references to the resource, including any views of the resource, need to be released.
- Deferred destruction processing must take place. The simplest way to ensure this happens is to invoke the immediate context API.
After both of those steps are completed, any references taken by the wrapped resource should be released, and the D3D12 resource becomes exclusively owned by the D3D12 component. Be aware that D3D12 still requires waiting for GPU completion before completely releasing a resource, so be sure to hold a reference on the resource before doing the two steps above, unless you’ve already confirmed that the GPU is no longer using the resource.
All other resources or objects created by D3D11On12 will be cleaned up at the appropriate time, when the GPU has finished using them, using D3D11’s deferred destruction mechanism. However if you attempt to release the D3D11On12 device itself while the GPU is still executing, the destruction may block until the GPU completes.
Shader tracing and compiler enhancements
Direct3D 11.1 lets you use shader tracing to ensure that your code is performing as intended and if it isn’t you can discover and remedy the problem. The Windows Software Development Kit (SDK) for Windows 8 contains HLSL compiler enhancements. Shader tracing and the HLSL compiler are implemented in D3dcompiler_nn.dll.
The shader tracing API and the enhancements to the HLSL compiler consists of the following methods and functions.
- ID3D11RefDefaultTrackingOptions::SetTrackingOptions
- ID3D11RefTrackingOptions::SetTrackingOptions
- ID3D11TracingDevice::SetShaderTrackingOptions
- ID3D11TracingDevice::SetShaderTrackingOptionsByType
- ID3D11ShaderTraceFactory::CreateShaderTrace
- ID3D11ShaderTrace::TraceReady
- ID3D11ShaderTrace::ResetTrace
- ID3D11ShaderTrace::GetTraceStats
- ID3D11ShaderTrace::PSSelectStamp
- ID3D11ShaderTrace::GetInitialRegisterContents
- ID3D11ShaderTrace::GetStep
- ID3D11ShaderTrace::GetWrittenRegister
- ID3D11ShaderTrace::GetReadRegister
- D3DCompile2
- D3DCompileFromFile
- D3DDisassemble11Trace
- D3DDisassembleRegion
- D3DGetTraceInstructionOffsets
- D3DReadFileToBlob
- D3DSetBlobPart
- D3DWriteBlobToFile
The D3dcompiler.lib library requires D3dcompiler_nn.dll. This DLL is not part of Windows 8; it is in the \bin folder of the Windows SDK for Windows 8 along with the Fxc.exe command-line version of the HLSL compiler.
Note
While you can use this library and DLL combination for development, you can’t deploy Windows Store apps that use this combination. Therefore, you must instead compile HLSL shaders before you ship your Windows Store app. You can write HLSL compilation binaries to disk, or the compiler can generate headers with static byte arrays that contain the shader blob data. You use the ID3DBlob interface to access the blob data. To develop your Windows Store app, call D3DCompile2 or D3DCompileFromFile to compile the raw HLSL source, and then feed the resulting blob data to Direct3D.
d3d11.dll скачать для Windows 7, 8, 10. Как исправить ошибку d3d11.dll.
d3d11.dll – это динамическая библиотека, которая входит в состав DirectX11. Этот файл имеет большое значение для игр, так как используется для построения трёхмерных сцен. Соответственно ни одна игра работать без него не будет. Ни NFS, ни Sleeping Dogs, ни Tomb Rider, ни куча других игр не принесут вам то удовольствие, на которое вы рассчитывали, если в системе не установлен файл d3d11.dll.
Но к счастью для любителей виртуальной реальности, эта проблема легко решается независимо от числа игр и прочих приложений, которые не работают из-за этого файла. Существует два эффективных решения, которые одинаково подойдут для любой операционной системы. Вы должны либо скачать файл файл d3d11.dll, что без лишних заморочек можно сделать прямо на нашем сайте, либо полностью переустановить библиотеку. Давайте подробнее рассмотрим оба.
Вариант первый
Заключается главным образом в том, чтобы скачать и корректно установить d3d11.dll. На нашем сайте к вашим услугам всегда представлена библиотека dll-файлов самых последних версий совершенно бесплатно. Будьте бдительны. Не связывайтесь с мошенниками, требующими деньги за такие файлы.
Вам нужно выполнить нехитрый порядок действий:
1. Скачать файл d3d11.dll
2.Разархивировать файл и скопировать библиотеку в буфер обмена.
3.Определить разрядность ОС. Для этого откройте «мой компьютер» и посмотрите раздел «свойства системы». В графе «тип системы» вы найдёте нужную информацию.
4.Установить библиотеку в нужную системную папку. Если у вас установлена 32-битная операционная система, то устанавливайте библиотеку в C:WindowsSystem32. Если же ваша ОС 64-битная, то вставляйте библиотеку в C:WindowsSysWOW64.
5. Зарегистрировать файл в системе. Для этого нажмите сочетание клавиш Win+R или в меню «пуск» нажмите «выполнить» и в возникшее окно скопируйте без кавычек команду «regsvr32 d3d11.dll». После чего нажмите «ОК».
Как видите, с этим может справиться даже малоопытный пользователь ПК. Но если у вас остались какие-то вопросы или сомнения, то посмотрите короткое видео, приложенное к этому разделу. Возможно так для вас многое прояснится.
Вариант второй
Первый способ весьма эффективен, но в тех случаях. Когда речь идёт только об одном файле d3d11.dll.
Если игра так и не заработала, то, возможно, что у вас нет ещё каких-то dll-файлов. Могут возникнуть таблички того же типа, что мы описывали ранее, но с другим названием отсутствующего файла.
Именно поэтому второй способ – это переустановка всего пакета DirectX. Это самое надёжное средство от всех возможных ошибок, связанных с dll-файлами. Алгоритм действий таков:
1. Скачать веб-установщик
2. Разархивировать и запустить программу.
3. Соглашаться со всем, что предложит программа посредством нажатия «ok» или «next».
Вот теперь все игры и прочие приложения, которые нуждаются в библиотеках DirectX, точно будут работать корректно, если конечно причина отказа игры запускаться была именно в файлах dll. Для закрепления в памяти алгоритма действий по устранению ошибок путём скачивания DirectX вы можете посмотреть небольшую, но подробную видео инструкцию.
Подводя итоги, заметим, что в оба способа имеют как плюсы, так и незначительные минусы. Второй способ, как наверно уже стало понятно из прочитанного выше, более универсален. Но он чуть более затратен в плане трафика чем первый и потребует чуть больше вашего времени чем первый. Если же вы уверены в том, что вам не хватает только файла d3d11.dll, то смело выбирайте первый. Если же он всё-таки не помог, то переходите ко второму способу. Ну а возможность поэкспериментировать и попробовать оба даст вам возможность расширить навыки в пользовании ПК.
Решаем проблему
Существует сразу 2 способа исправить ситуацию и бесплатно установить d3d11.dll в систему Windows XP, Windows 7, Windows 8 или Windows 10. Первый вариант подразумевает загрузку и инсталляцию всего пакета DirectX, второй же – одного файла d3d11.dll. Рассмотрим оба метода подробнее.
Устанавливаем DirectX
Установка DirectX – это правильный способ. В отличие от загрузки одного d3d11.dll, он дает практически 100% положительный исход и, соответственно, успешный запуск игры. Что для этого нужно? Во-первых, скачать саму библиотеку с ее официального сайта, во-вторых, правильно ее установить. Ни с первым, ни со вторым сложностей возникать не будет – рассмотрим оба пункта.
- Скачиваем по прямой ссылке библиотеку DirectX (для вашего удобства мы загрузили последнюю версию с официального сайта Microsoft и разместили у себя). Запустите загруженный WEB-инсталлятор и примите условия лицензионного соглашения. Для этого установите флажок переключателя в позицию, обозначенную на скриншоте цифрой «1». Как только это будет сделано, кликаем по виртуальной клавише «Далее».
- В следующем окне отключите установку дополнительного программного обеспечения (в нашем случае это Bing панель) и нажмите «Далее».
- На этом установка окончена, нам остается только кликнуть по кнопке с надписью «Готово».
Теперь можно пробовать запускать игру.
Скачиваем и устанавливаем d3d11.dll
Существует и еще один способ заставить игрушку работать без установки DirectX. Мы можем просто отдельно скачать файл d3d11.dll и добавить его в системную папку. Однако такой вариант не дает стопроцентной гарантии того, что проблема будет решена, и игра запустится. Но, для полноты картины, давайте рассмотрим и этот способ.
Сначала скачаем сам d3ddll
Тут следует заострить ваше внимание. Дело в том, что официального файла не существует и, если вы попытаетесь найти его в сети, вероятность загрузить вирус на ПК будет практически стопроцентной
Мы извлекли компонент из библиотеки DirectX, скачанной с официального сайта Microsoft, и поместили его на свой сайт. Скачивайте файл по прямой ссылке и не беспокойтесь о «здоровье» вашего компьютера.
Теперь нужно поместить загруженную dll в системный каталог, причем в зависимости от разрядности. Для того чтобы проверить по какой архитектуре выполнена ваша операционная система, используйте сочетание «горячих клавиш» Win+PauseBreak. На скриншоте отмечен пункт, который требует внимания. В нашем случае это 64-bit Windows 10
- После того как вы узнали разрядность Windows, поместите d3ddll в C:\Windows\system32 если у вас x32-битная ОС, и в C:\Windows\sysWOW64 – если x64.
- Также копируйте файл и в каталог с игрой. Причем именно в ту папку, где содержатся исполняемые компоненты с расширением .exe.
- Осталось только зарегистрировать файлы. Одного добавления в папку, к сожалению, недостаточно. Открываем инструмент «Выполнить» (используйте сочетание клавиш Win+R) и вводим в окошко команду: regsvr32 d3ddll, затем жмем «ОК».
Данный вариант не дает гарантии успешного запуска игры. Например, зарегистрировать файл из-за отсутствия остальных компонентов удается далеко не всегда. В любом случае перезагрузите компьютер и попробуйте запустить игру.
Initializing D3D11On12
To begin using D3D11On12, the first step is to create a D3D12 device and command queue. These objects are provided as input to the initialization method D3D11On12CreateDevice. You can think of this method as creating a D3D11 device with the imaginary driver type D3D_DRIVER_TYPE_11ON12, where the D3D11 driver is responsible for creating objects and submitting command lists to the D3D12 API.
After you have a D3D11 device and immediate context, you can off of the device for the ID3D11On12Device interface. This is the primary interface that is used for interop between D3D11 and D3D12. In order to have both the D3D11 device context and the D3D12 command lists operate on the same resources, it is necessary to create “wrapped resources” using the CreateWrappedResource API. This method “promotes” a D3D12 resource to be understandable in D3D11. A wrapped resource starts out in the “acquired” state, a property which is manipulated by the AcquireWrappedResources and ReleaseWrappedResources methods.