Plex media server
Содержание:
- VPN on the Plex Media Server Computer
- Preparation
- The “Paid For” Parts: Mobile Apps and Subscription Services
- Жизнь до PLEX
- Desktop Computer
- Setting up Plex on Kodi
- Шаг второй. Установка PlexConnect
- 1. Организуйте агентов Plex
- Features
- Плагины и каналы в PLEX Media Server
- Plex Media Server — Установка
- 4. Installing Plex Apps
- Opening the Plex Web App on a Device Other than the Server Itself
- What is Plex Media Server?
- 3. Управление транскодированием Plex
- Шаг третий. Создание сертификата.
- Why Use TIDAL With Plex?
- Plex Apps that Support TIDAL
- Link to an Existing TIDAL Subscription for Access
- Streaming with the Plex Kodi Addon
- Sharing Plex Content
- Step by Step
- Какие каналы доступны на Plex Live TV?
- Subtitles
- 4. Оптимизируйте свои видео Plex.
- Installing the Plex Kodi addon
VPN on the Plex Media Server Computer
The platforms on which some Plex apps run don’t allow us to actively scan the network to try and find available Plex Media Servers. Other platforms don’t allow direct communication to any private IP (e.g. any IP on your local network). Among others, the PlayStation, Smart TVs, and Xbox apps are affected by these restrictions.
That means we have to get connection information in another way, which is provided when both the Plex Media Server and the app sign into your Plex account. This is accomplished because your Plex Media Server will send its private and public IP address to plex.tv, which can then be retrieved and used by the Plex app to find servers.
When using a VPN (Virtual Private Network), the IP information can be incorrect because of the VPN and thus the Plex app doesn’t have the correct/necessary information to be able to find your Plex Media Server and connect.
What You Can Do
Essentially, you want to make sure that your VPN isn’t interfering when your Plex Media Server sends the connection information to plex.tv.
- Disable the VPN
- Launch Plex Media Server
- Ensure that the Server successfully signs in under Settings > Server > General
- Enable the VPN
When You Should Do It
You should take the above steps whenever new connection information would be sent to plex.tv, which includes:
- Launching or restarting the Server
- Signing in to the Server
- Whenever your computer experiences a network change (e.g. a laptop switching from wired to wireless connection)
Last modified on: April 12, 2019
Preparation
Before You Begin
Before you begin installing Plex Media Server, it’s strongly recommended that you check that your media collection has been named and organized in a way that Plex will understand. If not, you may notice content isn’t recognized, is mis-matched, or not found at all.
You may already be naming and organizing your media files in a way suitable for Plex. Here are the important things:
- Movies are gathered together in a “Movies” type folder, TV Shows in a “TV Shows” type folder, etc.
-
Movies are named as follows:
-
TV Show episodes are named with the season and episode:
-
TV Show episodes are stored in their own folder as follows:
- For TV shows, the folder structure can be very important. Make sure you have show folders that contain season folders that contain the episodes
Related Page: Your Media
Tip!: It’s important to understand that Plex Media Server does not have its own graphical user interface. When you run the server on your computer, NAS, or other device, you won’t see a window open with a “server UI” or similar. Instead, you use the Plex Web App to manage your server.
Download the Installer
The Plex Media Server can be downloaded for free from the Plex Downloads page. There are many platforms available:
- Windows
- macOS
- Linux
- Compatible NAS devices
From the Downloads page, choose the platform or device you need, and download the installer.
Related Page: Plex DownloadsRelated Page: NAS Devices
Get a Plex (Player) App
While you’re on the Downloads page, you may wish to download a player app as well. The server includes the browser-based Plex Web App, but you’ll probably want to download an app for other devices. There are many available:
- Windows/macOS Desktop PCs: Plex for Windows, Plex for macOS, or Plex Media Player (primarily intended for HTPC usage)
- Mobile Devices: Android, iOS
- Connected Devices: Amazon Fire TV, Apple TV, Android TV, Roku, Smart TVs, game consoles, and more
Related Page: Player Apps and Platforms
The “Paid For” Parts: Mobile Apps and Subscription Services
There are really two categories of things that are “paid for” within Plex:
Subscription Services
Plex Pass
The Plex Pass subscription includes free activation/unlocking of our mobile apps as well as other features and benefits:
- Activate/unlock our Android and iOS mobile apps simply by signing into your Plex account within the app.
- DVR Recording: Record over-the-air broadcasts available in your area, using a compatible tuner and digital antenna.
- Add lyrics from LyricFind to your music libraries to follow along whenever you want.
- Invite full Plex accounts (not just managed users) of family members to be a part of your Plex Home, allowing easy switching between accounts, and restrict what content you share from your server.
- Skip intros in TV episodes in your personal library.
- Get early preview access to new apps and features.
- And even more!
Related Page: Plex Pass Subscriptions
Plex Arcade
- Access a default library of official, classic, retro games from Atari.
- Bring your own supported game ROMs and emulators.
- Stream from your server to a variety of devices, including Android or iOS mobile apps, Android TV or Apple TV, or your computer.
- Access your games even when away from home.
- Connect your favorite compatible controller or use built-in controls.
Related Page: Plex Arcade SubscriptionsRelated Page: Arcade Gaming (Plex Labs)
TIDAL Music Streaming
- Stream over 60 million tracks, anywhere you are.
- TIDAL HiFi plans support lossless music quality streaming.
- Enhance and expand a library of your own personal music by integrating TIDAL streaming.
- Stream music tracks that appear in your favorite movies and TV shows.
Related Page: TIDAL Music through PlexRelated Page: TIDAL
Removing Playback Limitations from Mobile Apps
As mentioned above, our mobile apps offer in-app purchases that activate/unlock the app to remove playback limitations when streaming from a Plex Media Server:
- Android and iOS mobile apps offer one-time, in-app purchases.
- Again, a Plex Pass subscription will activate these features without additional purchase.
Related Page: Related Page:
Last modified on: March 31, 2021
Жизнь до PLEX
5 лет назад в моем распоряжении оказалось два медиаплеера Western Digital TV Live (WDTV Live gen 2). Подключив к одному плееру внешний жесткий диск 2.5”, можно было поделиться коллекцией для всех остальных устройств в сети. Оба устройства были подключены к роутеру по сети Ethernet, доступ к файлам осуществлялся по протоколу SMB.
Схема с двумя плеерами рабочая, но есть недостатки:
- Регулярные подвисания плееров.
- Переиндексация коллекции. Запускается при перезагрузке или подключении диска. Во время индексации блокируется доступ на проигрывание, время индексации занимает продолжительное время.
- Неудобное пополнение коллекции. Добавить новый фильм можно двумя способами: отсоединить диск от плеера, подключить к компьютеру или загрузить фильм на сетевой диск.
Схема с просмотром видео устраивала “на троечку”, но предстояло реализовать поддержку домашней коллекции музыки. Задумался о централизации хранилища — переносе всего содержимого на NAS.
Wi-Fi маршрутизатором был выбран MikroTik RB951G-2HnD, в качестве NAS хранилища — Synology DS215j. Медиаплееры WDTV Live. Стереосистему подключил к сети через Airport Express MC414RS/A по протоколу Airplay.
Synology предлагает доступ к разным сервисам: DLNA-сервер, видео-сервер, аудио-станция, фото-станция и пр. Штатные приложения работают достаточно хорошо, регулярно обновляются, есть iOS клиенты. А внешний вид приложения и взаимодействие с пользователем на любителя.
Через менеджер пакетов есть возможность установить приложения от сторонних разработчиков. Выбор медиа-серверов небольшой, но среди них есть PLEX Media Server.
PLEX Media Server — очень простой и красивый медиа-сервер, с поддержкой разных коллекций контента: фотографии, фильмы, видео, музыка.
Сервер PLEX существует для большинства платформ (macOS, Windows, Linux, NAS), но для полноценной работы требуется мощный процессор.
Что мне разонравилось в Synology:
- для каждого сервиса (музыка, фильмы) требуется отдельное приложение;
- все штатные приложения значительно отличаются друг от друга;
- слабый процессор, даже для работы штатных приложений(docker, mail server), которые анонсировали в Synology OS 6.
Для нормальной работы PLEX на Synology потребуется хорошее устройство, серии Play или Plus. В моем распоряжении была бюджетная модель 215j, с процессором ARM 700mhz. Для стриминга файлов (без транскодирования) этого достаточно, но если хочется больше возможностей — необходимо другое железо.
После ограниченного знакомства с PLEX, привычный ритм жизни перестал быть спокойным. Началась подготовка к переходу на более мощное железо.
Desktop Computer
Running Plex Media Server on a desktop computer is a very popular option. This allows you to choose your operating system and you have flexibility in your computer components.
Operating System
You can run Plex Media Server on a desktop computer running a number of operating systems.
Tip!: You’ll generally want to ensure that you’ve installed all “critical” type updates or service packs for your current operating system.
Windows
When running on Windows, the following operating system versions are supported:
- Windows 7 SP1 / Windows Server 2008 R2 SP1
- Windows 8 / Windows Server 2012
- Windows 8.1 (with Update) / Windows Server 2012 R2 (with Update)
- Windows 10
Linux
We have official Plex Media Server releases available for the following Linux Distributions:
- CentOS 7 or newer
- Debian 8 or newer
- Fedora 27 or newer
- SUSE 15 or newer
- Ubuntu 16.04 or newer
FreeBSD
Plex Media Server releases are available for FreeBSD 11.2 or newer.
Note: If running in a FreeBSD “jail”, you’ll want to make sure that VNET is enabled. (For instance, FreeNAS has instructions.)
CPU
CPU requirements can vary dramatically, depending on how exactly you want to use Plex, which particular Plex apps you’ll be using, properties of your media, how many people will be using Plex at the same time, and more.
As a minimum, we recommend:
Intel Core i3 (or equivalent) or faster
Note: While Plex Media Server can install and run on a computer with a slower processor, you might not have a very good experience, depending on your usage.
Generally, any modern computer should meet that minimum. However, if you will have multiple people accessing content simultaneously and you’ll sometimes require transcoding of content during playback, then you may well need something faster than the minimum.
If your computer’s CPU is not powerful enough to keep up with transcoding your media, you will notice pausing or buffering as the app waits for the server to catch up. We have additional information to help you figure out what kind of processor you might need for your own particular usage.
Related Page: Related Page:
In general, Plex Media Server doesn’t require large amounts of RAM. 2GB of RAM is typically more than sufficient and some installs (particularly Linux-based installs) can often happily run with even less. Of course, more RAM won’t hurt you and will certainly be helpful if you’re also doing other things on the computer.
Setting up Plex on Kodi
The Plex Kodi addon needs just a bit of configuration before you can begin streaming the media on your Plex server to your Kodi device. You’ll need to link your Plex account before you can browse your media libraries.

Select the Plex Kodi addon from the Addons menu, then click it to launch the addon.

Next, click the Sign in button to begin associating your Plex account with this device.

Take note of the code displayed on your screen, then open your browser and go to https://plex.tv/link.

Next, log in to Plex however you prefer.

Then type in the code you were given by the Plex Kodi addon and click the Link button to associate the device with your account.

You’ll see a green check if your device has been associated correctly.

Now open Kodi and you’ll see your Plex content displayed on the screen. The addon is configured and ready to use.
Шаг второй. Установка PlexConnect
Следует особо отметить, что разработчики PlexConnect рекомендуют устанавливаться версию Python 2.7! Владельцы NAS (по крайней мере, от Synology) могут установить его из своих репозиториев: Центр пакетов –> Служебные программы –> Python –> Установить.
Далее пользователям настольных систем необходимо скачать отсюда пакет PlexConnect и распаковать архив в любое удобное место.
После этого редактируем в файле Settings.py ключи
‘ip_pms’ – указываем ip-адрес устройства, на котором развернут Plex Media Server;
‘port_pms’ – указываем выбранный вами порт, в случае использования порта отличного от стандартного.

Пользователи NAS Synology:
должны позволить устанавливать пакеты сторонних разработчиков: Центр пакетов –> Настройки –> Основное –> Уровень доверия –> Любой;
добавить репозиторий http://www.brigittehelsen.be/plexconnect/ в Центр пакетов –> Настройки –> Источники пакетов и
установить PlexConnect из раздела «Сообщество» Центра пакетов.
На этом настройка PlexConnect закончена для владельцев NAS Synology, и вы можете пропустить следующий шаг.
1. Организуйте агентов Plex
Plex может автоматически вставлять метаданные для вашего контента. Хотя вам нужно очень точно отформатировать медиафайлы Plex, чтобы это работало, это стоит сделать.
Конечно, Plex может добавлять постеры к фильмам и названия сериалов, но метаданные идут гораздо глубже. Он будет знать, какие актеры были в шоу, на каком телеканале транслировалось шоу, кто поставил каждый фильм и что различные критики на известных сайтах обзора думали о содержании. После того как вы добавили метаданные, вы даже можете использовать их для поиска связанных шоу, других фильмов, в которых снимались некоторые актеры, и так далее.
Но ничего из этого не сработает, если вы неправильно настроите своих агентов. Вам необходимо убедиться, что Local Media настроен для других источников метаданных. Если нет, Plex будет использовать существующие локальные метаданные в файле в качестве основного источника. Во многих случаях эти метаданные будут неверными.
Чтобы изменить порядок, перейдите в « Настройки»> «Настройки»> «Агенты» . Используя вкладки в верхней части экрана, выберите «Фильмы»> «База данных фильмов» . Перетащите локальные медиаресурсы (фильмы) под базу данных фильмов . Затем перейдите в « Программы»> «TheTVDB» и переместите « Local Media Assets (TV)» в « TheTVDB» .
Features
-
- Getting Started with Plex Arcade
- Plex Arcade Subscriptions
- Plex Arcade Frequently Asked Questions
- Naming and organizing Game files and Cores
-
- Overview
- Supported Plex Companion Apps
- Choose a Player
- Fling Media
- Controlling Flung Media
- Plex Companion Remote Control Issues
-
- Camera Upload Overview
- Set Up Camera Upload (Android)
- Set Up Camera Upload (iOS)
- Default Camera Upload Settings
-
- Frequently Asked Questions – DVR & Live TV
- Supported DVR Tuners and Antennas
- Live TV & DVR (Set Up and Manage)
- Program Guide
- Watching Live TV
- Setting Up Recordings
- Manage Your Recordings
- Removing Commercials
- Using XMLTV for guide data
- Community Supported Tuners
-
- Media Optimizer Overview
- Example Media Optimizer Usage
- Creating Optimized Versions
- Conversion Queue
-
- Mobile Sync Overview
- Sync Media to a Device
- Sync Multiple Items Dynamically
- Sync Prepared Items to the Device
- Monitoring Sync Status
- Settings for Sync Jobs
- Mobile Sync for Shared Users
- Mobile Sync FAQ
- Which Plex Apps support Mobile Sync?
- Where are sync transcodes stored on my computer?
-
- Upgrading Music Libraries to the New Metadata System
- Correcting Your Music Content Matches
- Changing Artist, Album, or Track Information
-
- What is Plex Home?
- Creating a Plex Home
- Example Plex Home Setup
- Managed Users
- Fast User Switching
- Parental Controls
- How do I leave a Plex Home?
- Plex Home Security Changes
- Consequences of Being in a Plex Home
- I forgot my Plex Account PIN; how can I reset it? How can I change my PIN?
-
- Remote Access
- Troubleshooting Remote Access
- Creating and Managing Server Shares
- Restricting the Shares
- Single Item Shares
-
- Watch Together
- Frequently Asked Questions – Watch Together
-
Other Features
- Skip TV Show Intros
- Cinema Trailers, Extras, & Related Albums
- Video Preview Thumbnails
- HDR to SDR Tone Mapping
- Automatic Lyrics from LyricFind
- Auto Tagging of Photos
- Webhooks
- Play Queues
- Play Queue Post-Play Screen
- Watchlist for Free Movies & Shows on Plex
- Push Notifications
- Places (Location-Based Photos)
- Why won’t trailers or extras play?
Плагины и каналы в PLEX Media Server
PLEX Media Server поддерживает установку плагинов и каналов.
Каналы — доступ к популярным стриминговым сервисам. Многие сервисы не будут интересны, т.к. предназначены для англоязычных пользователей.
Но если вы пользуетесь сервисами для просмотра сериалов «Soap4Me» или «Kino.Pub», то для них доступны плагины PLEX. Что это дает? Доступ к контенту с любого устройства, единый интерфейс и т.п. Правда реализован доступ через плагины.
Плагины — расширение функциональности PLEX Media Server. Из популярных плагинов можно установить «Кинопоиск», при индексации фильмов будет заполнена информация о фильмах, загружен постер и т.п.
Plex Media Server — Установка
Установить Plex можно или же из файла который находится по данной ссылке, или же посетив сайт разработчиков:
После установки Plex Media Server’a на ПК, в левой нижней части экрана появится иконка Plex сервера:
1
А так же в интернет браузере произойдет автоматический запуск страницы Plex. В случае если запуск страницы не произошел, сделайте двойной щелчок правой клавишей мышки на иконке Plex сервера в нижней левой чати экрана (рис. 1)
2
Для продолжения настройки Plex нажмите кнопку «Согласен»,
3
4
5
6
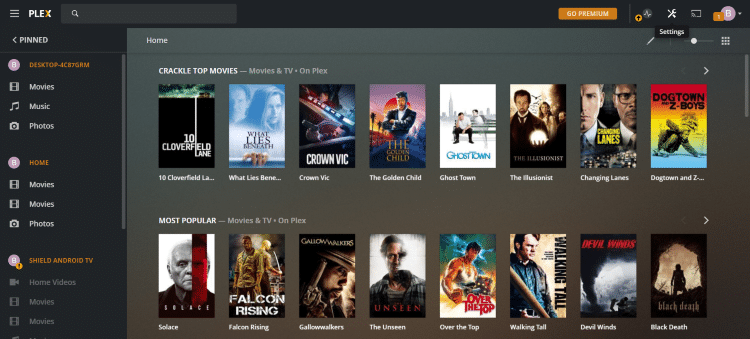
После нажатия кнопки готово, откроется основная страница медиатеки Plex.
7
На данном этапе основная установка Plex Media Server окончена
Для оптимальной работы Plex оставьте все настройки по умолчанию.
4. Installing Plex Apps
Downloading Apps
Whether you have an iPhone, Android, Roku, Smart TV, Xbox, or other device, you will want to download a Plex App from our website or the device’s app store. When on the Plex Downloads page, check the list of apps and follow the instructions for your preferred device.
Related Page: Plex Downloads
Network Connectivity
Once you have downloaded the app, make sure you are on the same local network as the server. If both are on the same network, everything should work, and you will be able to browse and play media from the device.
If you are trying to access Plex Media Server from a device outside of your home network, remote access will need to be set up and running.
Related Page:
Connecting to Plex with Remote Access
One of the great features of Plex is the ability to access and stream your media when you’re away from home. By default, your Plex Media Server will attempt to set up this Remote Access feature for you automatically. While the automatic setup works for a lot of our users, it can fail on some home networks. If you have trouble getting it set up or decide you’d rather not have it enabled, we have additional resources and troubleshooting information available.
Related Page: Related Page:
Opening the Plex Web App on a Device Other than the Server Itself
On the Same Local Network
To open Plex Web App from a different device than the server computer while still on the same network:
- Open a browser window
- Type into the address bar (e.g “http://192.168.1.5:32400/web”)
- The browser will connect to the server and load Plex Web App
On a Different Network
If you’re on a different network than the server computer (or the entire “local network” is not in the private network IP ranges), you’ll first need to set up a SSH tunnel so that you can access things as if they were local.
Tip!: This is only necessary for the initial setup. Once you’ve gone through the setup, you can access as normal.
macOS or Linux
- Open a Terminal window or your command prompt
- Enter the following command (substituting the IP address of your server as appropriate):
- Open a browser window
- Type into the address bar
- The browser will connect to the server as if it were local and load Plex Web App
Windows
If you’re using Windows on your local system and your server is on Linux or macOS, you’ll need to use an application such as Putty or Windows 10’s built-in SSH client that can create the SSH tunnel for you. You can use instructions like these for setting up the Putty/SSH connection. If following that, you would use this information:
- Gateway: ip.address.of.server
- Source Port: 8888
- Destination: localhost:32400
Once you have the SSH tunnel set up:
- Open a browser window
- Type into the address bar
- The browser will connect to the server as if it were local and load Plex Web App
If your server is running Windows, then you could do a standard Remote Desktop session or similar.
Last modified on: July 9, 2020
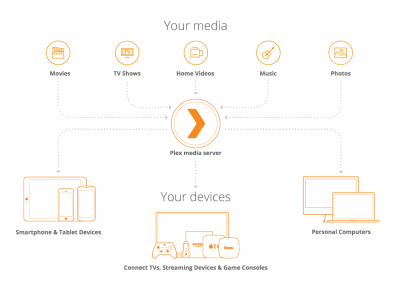
What is Plex Media Server?
Plex Media Server is an all-in-one media software system that stores and transmits content from a central location to all your favorite devices.
Plex works as a “hub” for all your favorite media including Movies, TV Shows, Photos, Music and more. You can then install the Plex app onto any device to access this content wherever you are.
Users oftentimes install Plex on their favorite streaming device, including the Amazon Firestick, to stream downloaded movies from their home server.
However, Plex supports tons of devices including Fire TV, Android, Roku, Apple TV, Chromecast, and much more.
Plex is an all-encompassing media manager and might be the last streaming app you’ll need.
It is also a great tool for storing home videos, photos, and other personal items without taking up space on each specific device.
Plex gives you an easy way to access all of your stored media no matter your location.
A new addition to the Plex arsenal is its streaming app that is included with your free Plex subscription.
This app has tons of Movies and TV Shows that are free to stream on any device that has the Plex app.
While the main characteristics of Plex are provided with free registration, Plex also has a premium paid service available.
By purchasing Plex Pass, you will have access to even more features. This includes DVR abilities to record OTA content and full mobile app compatibility.
To get started with Plex you will first need a home media server to store all of your files. Many find that their home PC or desktop computer works perfectly for this purpose.
3. Управление транскодированием Plex
Plex может перекодировать ваши видео, чтобы их можно было воспроизводить на других устройствах. Например, настольные ПК и ноутбуки обычно имеют мощные процессоры, которые могут обрабатывать большинство форматов файлов, кодеков, разрешений и субтитров. Однако могут возникнуть проблемы с мобильными устройствами и приставками для потоковой передачи. Таким образом, Plex может редактировать ваши видео на лету, чтобы гарантировать их совместимость с другими гаджетами.
Обратной стороной транскодирования является то, что для этого требуется много ресурсов процессора. Если ваш сервер Plex работает на невыделенном компьютере, вы, вероятно, не хотите, чтобы потреблялась вся мощность вашего процессора. Даже если у вас есть выделенный сервер, вы в конечном итоге достигнете его пределов, если многие элементы перекодируются одновременно.
Решение — изменить настройки транскодера ( Настройки> Настройки> Транскодер ). Вам необходимо знать три значения (нажмите « Показать дополнительные», чтобы увидеть их все):
- Качество транскодирования: вы можете определить качество транскодирования с помощью раскрывающегося меню. Чем выше качество, тем медленнее будет перекодирование.
- Фоновое перекодирование x264 Preset: этот параметр определяет скорость фонового перекодирования, например, при использовании Mobile Sync, Cloud Sync или Media Optimizer. Чем медленнее перекодировка, тем меньше размер файла и выше качество, но тем медленнее время.
- Максимальное количество одновременных сеансов перекодирования — это самый важный параметр для большинства пользователей. Логика подсказывает, что чем больше разрешено одновременных перекодировок, тем больше нагрузка на ЦП. Учитывайте мощность вашего ЦП, независимо от того, является ли он выделенным сервером, и сколько людей будут одновременно вести потоковую передачу, и установите соответствующее число. С вашей стороны может потребоваться метод проб и ошибок.
Шаг третий. Создание сертификата.
Для Windows. Пользователям необходимо предварительно скачать и установить OpenSSL Win 32 light и Visual C++ 2008 Redistributable Package (x86).
Далее запускаете командную строку (cmd.exe) с правами администратора и выполняете следующую команду:
C:\OpenSSL-Win32\bin\openssl.exe req -new -nodes -newkey rsa:2048 -out C:\trailers.pem -keyout C:\trailers.key -x509 -days 7300 -subj “/C=US/CN=trailers.apple.com” -config C:\OpenSSL-Win32\bin\openssl.cfg
Затем:
C:\OpenSSL-Win32\bin\openssl.exe x509 -in C:\trailers.pem -outform der -out C:\trailers.cer
И напоследок:
type C:\trailers.key >> C:\trailers.pem
Для OS X и Linux. Юзеры запускают Terminal и выполняют команды:
openssl req -new -nodes -newkey rsa:2048 -out ~/Desktop/trailers.pem -keyout ~/Desktop/trailers.key -x509 -days 7300 -subj “/C=US/CN=trailers.apple.com”
Далее:
openssl x509 -in ~/Desktop/trailers.pem -outform der -out ~/Desktop/trailers.cer && cat ~/Desktop/trailers.key >> ~/Desktop/trailers.pem
Затем перемещаем 3 файла (trailers.pem, trailers.key, и trailers.cer) из корня диска C (для Windows) или с рабочего стола (для MacOS/Linux) в папку \assets\certificates\ каталога PlexConnect.
Наконец можно запустить PlexConnect.
Пользователи Windows запускают файл PlexConnect.py и разрешают доступ Python.exe в сеть.
Пользователи MacOS выполняют в терминале команду:
sudo “/Applications/PlexConnect-master/PlexConnect.py”
Пользователи Linux в терминале переходят к каталогу с PlexConnect и выполняют команду:
sudo ./PlexConnect.py
Теперь можно переходить к следующему шагу.
Why Use TIDAL With Plex?
Digital music users largely fall into two camps these days: those with their own, personal, curated music collection and others who use a music streaming service. The former group often runs into a dilemma: How do we keep discovering quality new music? How do we avoid losing ourselves, and our curated albums, in an infinite sea of (streaming) music?
To help provide a bridge between those two worlds, we’ve partnered with TIDAL, who has a vast universe of music, most of it available in high quality FLAC. In addition, we’ve worked out some really great ways to combine it with your own library.
Related Page:
With a TIDAL subscription (whether you already have one or want to start one through us) linked to your Plex account, you’ll be able to access TIDAL’s tens of millions of songs and videos through your Plex apps whenever you want.
Related Page:
For those who already have a music library on their Plex Media Server, you’ll see awesome integrations such as albums for an artist that are available on TIDAL, but missing from your library. Furthermore, you can even add content from TIDAL (artists, albums, or individual tracks) so that it appears alongside your own content in your personal library.
Related Page: Related Page:
Plex Apps that Support TIDAL
The following Plex client/player apps support accessing linked TIDAL content:
- Amazon Fire TV
- Android (mobile)
- Android Auto
- Android TV
- Apple TV
- Chromecast
- iOS
- macOS (desktop)
- PlayStation 4 (PlayStation 5 is not supported due to system limitations from Sony)
- Plex Media Player
- Plex Web App*
- Plexamp
- Roku
- Smart TVs (LG 4K/UHD , Samsung 2016+ UHD, VIZIO SmartCast)
- Sonos*
- Windows (desktop)
- Xbox One
“Augmenting” an existing Plex music library with TIDAL content requires running Plex Media Server v1.14.0.5470 or newer.
* Neither Firefox on Windows, nor Edge on Windows support playing lossless content from TIDAL HiFi. You can use Chrome on Windows for HiFi support.
** Sonos support available when controlled via Android or iOS mobile apps, which requires an active Plex Pass subscription.
Note: If you disable DRM support in your browser, you may receive a security warning and/or be unable to play TIDAL content.
Link to an Existing TIDAL Subscription for Access
If you already have a TIDAL subscription (whether “Premium” or “HiFi”) and simply want to link to it so that your Plex apps have access, you can do that, too.
- Visit your in the web app
- Choose the Other Services link
- Follow the Link your TIDAL account link, which will take you through the TIDAL site to authorize the account linking
In some cases, you may then need to restart your Plex Media Server or client apps to pick up the change. Otherwise, you can now start taking advantage of access to TIDAL through your Plex apps.
Note: Simply linking to an existing subscription like this lets you access TIDAL content in Plex, but it will not give your account any of the premium Plex features or a Plex Pass subscription that you can enjoy when the TIDAL subscription is managed and billed through Plex.
Streaming with the Plex Kodi Addon
Streaming with the Plex Kodi addon is really easy. Plex’s library browser is very similar to Kodi’s. You can change the layout and shuffle your library, browse, and play content.

All of the Plex metadata and cover artwork displays properly. The Plex Kodi addon supports playlists, searching, and suggestions.

Now, click on a show with multiple seasons. You can browse between seasons and episodes, complete with screenshots and summaries.

The addon has a full video playback menu, and can shuffle or loop through a playlist.

The Plex Kodi addon has an episode browser, and marks unwatched videos so it’s easy to find your place if you’re binging a show.
Plex’s settings menu pops up in place of Kodi’s if you open it during playback. It’s easy to turn subtitles on and off. You can also manually adjust the Quality if your connection is poor, or confirm that you’re watching a video at its original resolution.

Kodi video settings displays Kodi’s standard video settings menu.
Aside from a few small changes, watching videos with the Plex Kodi addon is just as easy as watching videos from your library in Kodi.
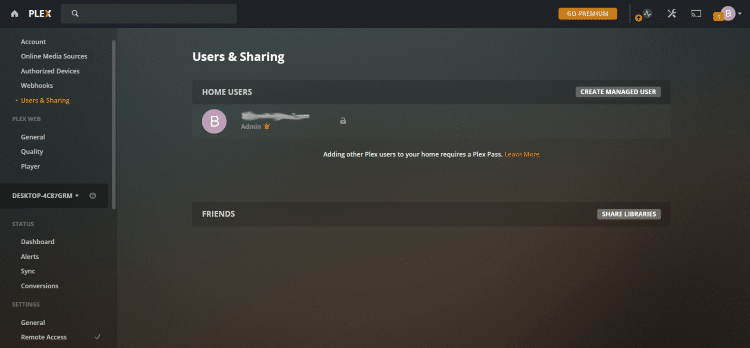
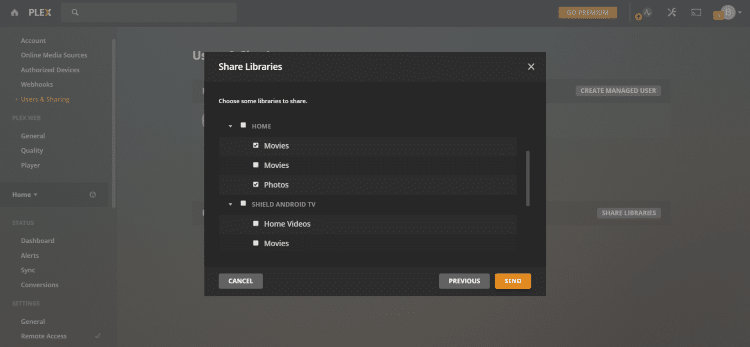
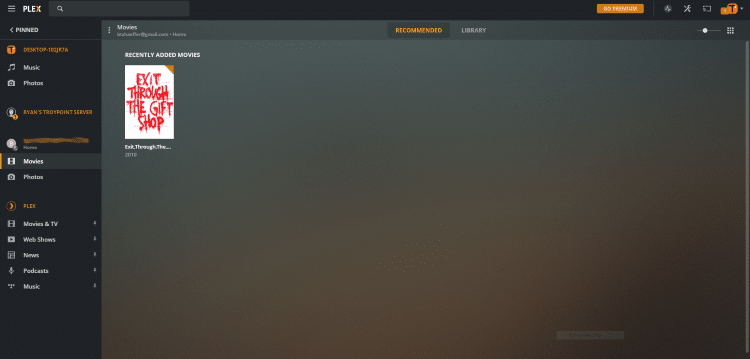
Sharing Plex Content
One of the most prominent features of the Plex system is the ability to share content across users.
Anyone with a Plex account is able to share their stored media files with friends, family, and more.
To do so, follow the guide below:
1. Launch Plex Media Server and click settings
2. Select Users & Sharing on the left side menu bar

3. Select Share Libraries next to the Friends Heading
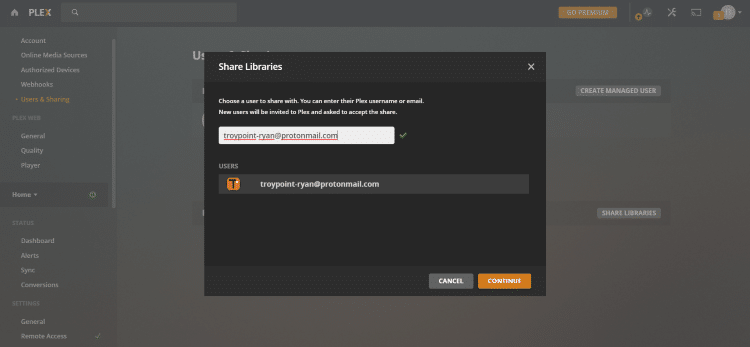
5. Choose the media you wish to share and click Send
6. Click finish or copy and send the provided link to ensure your shared media was delivered
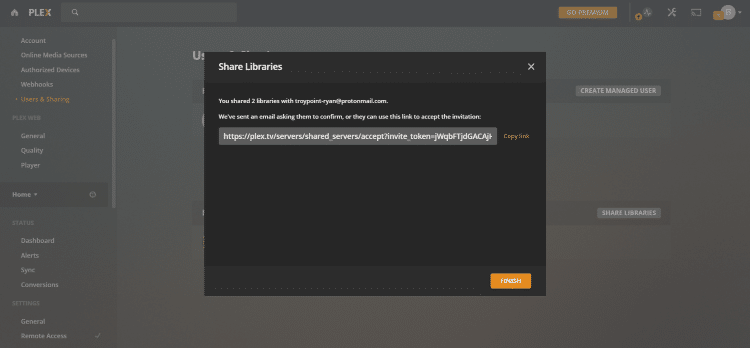
7. Shared content will now be available within the recipient’s media server
That’s it!
Sharing media between Plex users is a great way to enjoy tons of content and fill libraries with your favorite Movies, TV Shows, and more.
Plex makes storing and sharing all of your media a breeze.
Step by Step
Overview
Getting started with Plex isn’t really any different than installing other software, except that you first install the server software. Then, you install apps on your devices so that each device can connect to the server.
Preparing and Organizing Your Media Collection
Getting your media set up can be an important step. As you set up your Plex Media Server, you’ll be creating libraries for your media—movies, TV shows, music, photos, and home videos. When you do so, Plex will identify and match content like movies and TV shows and then gather things like movie poster artwork, movie casts, TV episode descriptions, and more to make your collections beautiful.
Plex will do its best to automatically identify and match your content. You can help that process out and give yourself the very best results by ensuring that your content follows our media preparation guidelines.
Related Page: Your Media
The “Plex Media Server: Start here!” Video
For those that would prefer a video overview, please check out our “Plex Media Server: Start here!” video.
https://player.vimeo.com/video/262574343
Какие каналы доступны на Plex Live TV?
Как и во многих потоковых сервисах, доступность каналов будет зависеть от того, в какой точке мира вы находитесь.
Согласно собственной литературе Plex, более 80 процентов каналов сервиса доступны во всем мире, при этом «меньшая часть каналов лицензируется только в Соединенных Штатах».
Некоторые из доступных каналов включают Reuters, Yahoo Finance, Fubo Sports Network, KidsFlix, EDGE Sport, IGN TV, BAMBU и Docurama.
В сентябре 2020 года Plex добавил кучу испаноязычных каналов . К ним относятся Latido Music, Sony Novellas, Sony Comedias и другие.
Plex пообещал, что в ближайшие месяцы и годы к сервису будет добавляться больше каналов.
Subtitles
Placement
The Subtitle Placement setting controls the location where subtitles are displayed on the screen when supported and enabled. The user can choose between Lower left, Lower right, Lower middle (the default), Upper left, Upper right, and Upper middle.
Color
The Subtitle Color setting allows the user to specify the color that subtitles are displayed in. They can choose between Light grey, Blended light grey, Yellow, Light yellow, and Blended light yellow.
Size
The Subtitle Size setting controls which preset size subtitles are rendered at: Tiny, Small, Normal, Large, and Huge.
Related Page: Using Subtitles
4. Оптимизируйте свои видео Plex.
Функцию оптимизации лучше всего рассматривать как «предварительный транскодер». Это позволяет вам выбирать определенные видео и конвертировать их в другой формат.
Например, если вы знаете, что хотите посмотреть «Историю игрушек», «Красавица и чудовище» и «Бэтмена» на своем iPad во время путешествия на следующей неделе, вы можете заранее оптимизировать видеофайлы. Это означает, что они будут немедленно готовы к игре на выбранном вами устройстве. Дальнейшего перекодирования не потребуется.
Оптимизация мультимедиа полезна, даже если вы знаете, что многие люди будут одновременно смотреть видео удаленно, поскольку это снизит нагрузку на ваш процессор.
Вы можете оптимизировать отдельное шоу, серию или даже всю библиотеку. Для начала перейдите к контенту, который хотите отредактировать, нажмите на три горизонтальные точки и выберите « Оптимизировать» .
В новом окне вы можете выбрать, хотите ли вы оптимизировать определенное количество видео или только непросмотренные видео
Что еще более важно, вы можете установить качество оптимизации. Вы можете выбрать Оптимизировать для мобильных устройств , Оптимизировать для ТВ , Исходное качество или Пользовательское
Параметр Custom позволяет указать конкретное устройство, разрешение и битрейт.
Если вы настроили длинный список элементов для оптимизации, вы можете управлять очередью, выбрав « Настройки»> «Статус»> «Конверсия» . Вы можете управлять уже оптимизированными файлами в разделе «Настройки»> «Управление»> «Оптимизированные версии» .
Installing the Plex Kodi addon
Since the Plex Kodi addon is part of the main Kodi repository, it’s pretty easy to get the addon installed as long as you know where to look. Here’s how I did it.
Start by opening Kodi and browsing to the Addons menu in the main screen. It will be at the bottom of the list on the left by default.
Next click the Download menu item.
Then scroll down and click the Video addons menu item to open the addons browser.
Scroll through the list of available video addons until you find the Plex menu item, and click it to open the install screen.
Next, click the Install button in the lower-right corner.
Now you’ll be taken back to the addon browser, and the Plex icon will change to show that the installation process has begun.
Then the Plex icon will change to a check when the installation has completed. When you’re finished, exit the addon browser and return to Kodi’s main screen in order to launch the Plex Kodi addon.
Now you can launch the Plex Kodi addon from the Addons menu.