Класс lock() модуля threading в python
Содержание:
- Multithreaded Priority Queue
- Приключение начинается. У древнего шлюза
- 17.1.4. RLock Objects
- Threading module
- Usage
- Объект Condition
- 17.1.9. Barrier Objects
- Как создавать потоки в Python
- Creating Thread Using Threading Module
- Компактные блокировки с with
- Communicating With Worker QThreads
- Структуры данных из пространства имен System.Collections.Concurrent
- Threading a Class
Multithreaded Priority Queue
The Queue module allows you to create a new queue object that can hold a specific number of items. There are following methods to control the Queue −
-
get() − The get() removes and returns an item from the queue.
-
put() − The put adds item to a queue.
-
qsize() − The qsize() returns the number of items that are currently in the queue.
-
empty() − The empty( ) returns True if queue is empty; otherwise, False.
-
full() − the full() returns True if queue is full; otherwise, False.
Example
#!/usr/bin/python

import Queue
import threading
import time

exitFlag = 0

class myThread (threading.Thread):
   def __init__(self, threadID, name, q):
      threading.Thread.__init__(self)
      self.threadID = threadID
      self.name = name
      self.q = q
   def run(self):
      print "Starting " + self.name
      process_data(self.name, self.q)
      print "Exiting " + self.name

def process_data(threadName, q):
   while not exitFlag:
      queueLock.acquire()
         if not workQueue.empty():
            data = q.get()
            queueLock.release()
            print "%s processing %s" % (threadName, data)
         else:
            queueLock.release()
         time.sleep(1)

threadList =
nameList =
queueLock = threading.Lock()
workQueue = Queue.Queue(10)
threads = []
threadID = 1

# Create new threads
for tName in threadList:
   thread = myThread(threadID, tName, workQueue)
   thread.start()
   threads.append(thread)
   threadID += 1

# Fill the queue
queueLock.acquire()
for word in nameList:
   workQueue.put(word)
queueLock.release()

# Wait for queue to empty
while not workQueue.empty():
   pass

# Notify threads it's time to exit
exitFlag = 1

# Wait for all threads to complete
for t in threads:
   t.join()
print "Exiting Main Thread"
When the above code is executed, it produces the following result −
Starting Thread-1
Starting Thread-2
Starting Thread-3
Thread-1 processing One
Thread-2 processing Two
Thread-3 processing Three
Thread-1 processing Four
Thread-2 processing Five
Exiting Thread-3
Exiting Thread-1
Exiting Thread-2
Exiting Main Thread
Previous Page
Print Page
Next Page
Приключение начинается. У древнего шлюза
Питон слывёт дружелюбным и простым в общении, но есть у него причуды. Нельзя просто взять и воспользоваться всеми преимуществами многопоточности в Python! Дорогу вам преградит огромный шлюз… Даже так — глобальный шлюз (Global Interpreter Lock, он же GIL), который ограничивает многопоточность на уровне интерпретатора. Технически, это один на всех mutex, созданный по умолчанию. Такого нет ни в C, ни в Java.
Задача шлюза — пропускать потоки строго по одному, чтоб не летали наперегонки, как печально известные стритрейсеры, и не создавали угрозу работе интерпретатора.
Без шлюза потоки подрезали бы друг друга, чтобы первыми добраться до памяти, но это еще не всё. Они имеют обыкновение внезапно засыпать за рулём! Операционная система не спрашивает, вовремя или невовремя — просто усыпляет их в ей одной известный момент. Из-за этого неупорядоченные потоки могут неожиданно перехватывать друг у друга инициативу в работе с общими ресурсами.
Дезориентированный спросонок поток, который видит перед собой совсем не ту ситуацию, при которой засыпал, рискует разбиться и повалить интерпретатор, либо попасть в тупиковую ситуацию (deadlock). Например, перед сном Поток 1 начал работу со списком, а после пробуждения не нашёл в этом списке элементов, т.к. их удалил или перезаписал Поток 2.
Чтобы такого не было, GIL в предсказуемый момент (по умолчанию раз в 5 миллисекунд для Python 3.2+) командует отработавшему потоку: «СПАААТЬ!» — тот отключается и не мешает проезжать следующему желающему. Даже если желающего нет, блокировщик всё равно подождёт, прежде чем вернуться к предыдущему активному потоку.
Благодаря шлюзу однопоточные приложения работают быстро, а потоки не конфликтуют. Но, к сожалению, многопоточные программы при таком подходе выполняются медленнее — слишком много времени уходит на регулировку «дорожного движения». А значит обработка графики, расчет математических моделей и поиск по большим массивам данных c GIL идут неприемлемо долго.
В статье «Understanding Python GIL»технический директор компании Gaglers Inc. и разработчик со стажем Chetan Giridhar приводит такой пример:
from datetime import datetime
import threading
def factorial(number):
    fact = 1
    for n in range(1, number+1):
        fact *= n
    return fact
number = 100000
thread = threading.Thread(target=factorial, args=(number,))
startTime = datetime.now()
thread.start()
thread.join()

endTime = datetime.now()
print "Время выполнения: ", endTime - startTime
Код вычисляет факториал числа 100 000 и показывает, сколько времени ушло у машины на эту задачу. При тестировании на одном ядре и с одним потоком вычисления заняли 3,4 секунды. Тогда Четан создал и запустил второй поток. Расчет факториала на двух ядрах длился 6,2 секунды. А ведь по логике скорость вычислений не должна была существенно измениться! Повторите этот эксперимент на своей машине и посмотрите, насколько медленнее будет решена задача, если вы добавите thread2. Я получила замедление ровно вдвое.
Глобальный шлюз — наследие времён, когда программисты боролись за достойную реализацию многозадачности и у них не очень получалось. Но зачем он сегодня, когда есть много- и очень многоядерные процессоры? Как объяснил Гвидо ван Россум, без GIL не будут нормально работать C-расширения для Python. Ещё упадёт производительность однопоточных приложений: Python 3 станет медленнее, чем Python 2, а это никому не нужно.
Что делать?
17.1.4. RLock Objects
A reentrant lock is a synchronization primitive that may be acquired multiple
times by the same thread. Internally, it uses the concepts of “owning thread”
and “recursion level” in addition to the locked/unlocked state used by primitive
locks. In the locked state, some thread owns the lock; in the unlocked state,
no thread owns it.
To lock the lock, a thread calls its method; this
returns once the thread owns the lock. To unlock the lock, a thread calls
its method. /
call pairs may be nested; only the final (the
of the outermost pair) resets the lock to unlocked and
allows another thread blocked in to proceed.
Reentrant locks also support the .
Threading module
Probably one of the largest drawbacks to the Python programming languages is that it is single-threaded. This means that Python will only run on a single thread naturally. If you have a large computational task, you might have already found that it takes Python a very long time to reach a solution, and yet, your processor might sit at 5% usage or even less. There are quite a few solutions to this problem, like threading, multiprocessing, and GPU programming. All of these are possible with Python, and today we will be covering threading. So, what is threading within the frame of Python? Threading is making use of idle processes, to give the appearance of parallel programming. With threading alone in Python, this is not really the case, but we can indeed use threading to make use of idle times and still gain some significant performance increases.
Along with the video above, here is some explained sample code for threading in Python 3:
import threading
from queue import Queue
import time
So far, we’ve imported threading, queue and time. Threading is for, well, threading, queue is going to help us make, you guessed it, a queue! Finally, we import time. Our only reason for importing time here is to simulate some idle time with a time.sleep() function.
Next, we’re going to define a thread lock. The idea of a threading lock is to prevent simultaneous modification of a variable. So, if two processes begin interaction with a variable with it is, say, 5, and one operation adds 2, and the other adds 3, we’re going to end with either 7 or 8 as the variable, rather than having it be 5+2+3, which would be 10. A lock will force an operation to wait until the variable is unlocked in order to access and modify it. Another use for a lock is to aid in input/output. With threading, it becomes quite easy to have two processes modifying the same file, and the data will literally just run over each other. So say you are meaning to save two values, like «Monday» and «Tuesday» to a file, you are intending for the file to just read: «Monday Tuesday,» but instead it winds up looking like «MoTunedsadyay.» A lock helps this.
print_lock = threading.Lock()
Here, we’re looking to use the lock to stop print functions from running over each other in their output.
Now we’re ready to create some sort of task to show off threading with:
def exampleJob(worker):
    time.sleep(.5) # pretend to do some work.
    with print_lock:
        print(threading.current_thread().name,worker)
So we define this exampleJob function, with a parameter of worker. With that job, we pretend to do something that will cause some idle, and that is just a time.sleep. After that, we use the print lock, which locks while we’re doing some output to prevent overlapping. Once the with statement completes, the lock will automatically unlock.
Now we need something that will assign tasks to our threads. Here, we’re calling our threads workers.
# The threader thread pulls an worker from the queue and processes it
def threader():
    while True:
        # gets an worker from the queue
        worker = q.get()

        # Run the example job with the avail worker in queue (thread)
        exampleJob(worker)

        # completed with the job
        q.task_done()
I’ll let the commenting speak for how this one works, as it would be too confusing to split this one up. See the video as well for more explanation if you need it.
Now we’ve used this «q,» but we’ve not defined it, so we had better do that:
# Create the queue and threader
q = Queue()
Now let’s create our threads, and put them to work!
# how many threads are we going to allow for
for x in range(10):
     t = threading.Thread(target=threader)

     # classifying as a daemon, so they will die when the main dies
     t.daemon = True

     # begins, must come after daemon definition
     t.start()

start = time.time()

# 20 jobs assigned.
for worker in range(20):
    q.put(worker)

# wait until the thread terminates.
q.join()

# with 10 workers and 20 tasks, with each task being .5 seconds, then the completed job
# is ~1 second using threading. Normally 20 tasks with .5 seconds each would take 10 seconds.
print('Entire job took:',time.time() - start)
And that’s all there is to it! Questions or comments? Leave them on the YouTube video!
The next tutorial: CX_Freeze Python Tutorial
Usage
ThreadPooled
Mostly it is required decorator: submit function to ThreadPoolExecutor on call.
Note
API quite differs between Python 3 and Python 2.7. See API section below.
threaded.ThreadPooled.configure(max_workers=3)
Note
By default, if executor is not configured — it configures with default parameters: max_workers=CPU_COUNT * 5
@threaded.ThreadPooled
def func():
    pass

concurrent.futures.wait()
Python 3.5+ usage with asyncio:
Note
if loop_getter is not callable, loop_getter_need_context is ignored.
loop = asyncio.get_event_loop()
@threaded.ThreadPooled(loop_getter=loop, loop_getter_need_context=False)
def func():
    pass

loop.run_until_complete(asyncio.wait_for(func(), timeout))
Python 3.5+ usage with asyncio and loop extraction from call arguments:
loop_getter = lambda tgt_loop tgt_loop
@threaded.ThreadPooled(loop_getter=loop_getter, loop_getter_need_context=True)  # loop_getter_need_context is required
def func(*args, **kwargs):
    pass

loop = asyncio.get_event_loop()
loop.run_until_complete(asyncio.wait_for(func(loop), timeout))
During application shutdown, pool can be stopped (while it will be recreated automatically, if some component will request).
threaded.ThreadPooled.shutdown()
Threaded
Classic threading.Thread. Useful for running until close and self-closing threads without return.
Usage example:
@threaded.Threaded
def func(*args, **kwargs):
    pass

thread = func()
thread.start()
thread.join()
Without arguments, thread name will use pattern: 'Threaded: ' + func.__name__
Note
If func.__name__ is not accessible, str(hash(func)) will be used instead.
Override name can be don via corresponding argument:
@threaded.Threaded(name='Function in thread')
def func(*args, **kwargs):
    pass
Thread can be daemonized automatically:
@threaded.Threaded(daemon=True)
def func(*args, **kwargs):
    pass
Also, if no any addition manipulations expected before thread start,
it can be started automatically before return:
@threaded.Threaded(started=True)
def func(*args, **kwargs):
    pass
Объект Condition
Объект condition это более продвинутая версия объекта event. Он представляет собой своего рода измененное состояние в приложении, и поток может дожидаться заданных условий, или сигнал о том, что условие было задано. Вот простой пример потребитель/производитель. Для начала, вам нужен объект condition:
Python
# представим добавление нового товара
condition = threading.Condition()
|
1 2 |
# представим добавление нового товара condition=threading.Condition() |
Поток «Производитель» должен получить условие, прежде чем он сможет уведомить потребителя о наличии нового товара:
Python
# Поток производителя
… генерация товара
condition.acquire()
… добавление товара в ресурс
condition.notify() # отправляем уведомление о новом товаре
condition.release()
|
1 2 3 4 5 6 7 8 |
# Поток производителя …генерациятовара condition.acquire()
…добавлениетоваравресурс condition.notify()# отправляем уведомление о новом товаре condition.release() |
Потребитель должен получить условие (следовательно, и соответствующий замок), после чего может попытаться извлечь товар из ресурсов:
Python
# Поток потребителя
condition.acquire()
while True:
… получаем товар из ресурсов
if item:
break
condition.wait() # в противном случае ожидаем поступление товара
condition.release()
… обработка товара
|
1 2 3 4 5 6 7 8 9 |
# Поток потребителя condition.acquire() whileTrue …получаемтоваризресурсов ifitem break condition.wait()# в противном случае ожидаем поступление товара condition.release() …обработкатовара |
Метод wait освобождает замок, блокирует настоящий поток, пока другой поток вызывает notify или notifyAll на тех же условиях, после чего замок восстанавливается. Если несколько потоков ожидает, метод notify активирует один из потоков, в то время как notifyAll активирует все потоки. Обход блока в методе wait возможен при помощи передачи значения timeout, в виде числа с плавающей запятой в секундах. После этого, метод выдаст результат после указанного времени, даже если мы не вызывали notify. Если вы используете timeout, вам нужно проверить ресурс, чтобы увидеть, произошло ли что-нибудь
Обратите внимание на то, объект condition связан с замком, и этот замок должен удерживаться, пред тем как вы сможете получить доступ к объекту condition. Соответственно, этот замок должен быть освобожден, когда вы выполнили все, что связанно с доступом к condition
В производственном коде вы должны использовать try-finally или with, как показано выше. Для того, чтобы связать condition с существующим замком, передайте замок конструктору Condition. Это также полезно, если вам нужно несколько объектов condition в одном ресурсе:
Python
lock = threading.RLock()
condition_1 = threading.Condition(lock)
condition_2 = threading.Condition(lock)
|
1 2 3 4 |
lock=threading.RLock() condition_1=threading.Condition(lock) condition_2=threading.Condition(lock) |
Вот и все! Вопросы будут у меня их и у самого есть, но мы справимся. Надеюсь.
17.1.9. Barrier Objects
New in version 3.2.
This class provides a simple synchronization primitive for use by a fixed number
of threads that need to wait for each other. Each of the threads tries to pass
the barrier by calling the method and will block until
all of the threads have made their calls. At this point,
the threads are released simultaneously.
The barrier can be reused any number of times for the same number of threads.
As an example, here is a simple way to synchronize a client and server thread:
b = Barrier(2, timeout=5)

def server():
    start_server()
    b.wait()
    while True
        connection = accept_connection()
        process_server_connection(connection)

def client():
    b.wait()
    while True
        connection = make_connection()
        process_client_connection(connection)
- class (parties, action=None, timeout=None)
-
Create a barrier object for parties number of threads. An action, when
provided, is a callable to be called by one of the threads when they are
released. timeout is the default timeout value if none is specified for
the method.- (timeout=None)
-
Pass the barrier. When all the threads party to the barrier have called
this function, they are all released simultaneously. If a timeout is
provided, it is used in preference to any that was supplied to the class
constructor.The return value is an integer in the range 0 to parties – 1, different
for each thread. This can be used to select a thread to do some special
housekeeping, e.g.:i = barrier.wait() if i == # Only one thread needs to print this print("passed the barrier")If an action was provided to the constructor, one of the threads will
have called it prior to being released. Should this call raise an error,
the barrier is put into the broken state.If the call times out, the barrier is put into the broken state.
This method may raise a exception if the
barrier is broken or reset while a thread is waiting.
- ()
-
Return the barrier to the default, empty state. Any threads waiting on it
will receive the exception.Note that using this function may can require some external
synchronization if there are other threads whose state is unknown. If a
barrier is broken it may be better to just leave it and create a new one.
- ()
-
Put the barrier into a broken state. This causes any active or future
calls to to fail with the . Use
this for example if one of the needs to abort, to avoid deadlocking the
application.It may be preferable to simply create the barrier with a sensible
timeout value to automatically guard against one of the threads going
awry.
-
The number of threads required to pass the barrier.
-
The number of threads currently waiting in the barrier.
-
A boolean that is if the barrier is in the broken state.
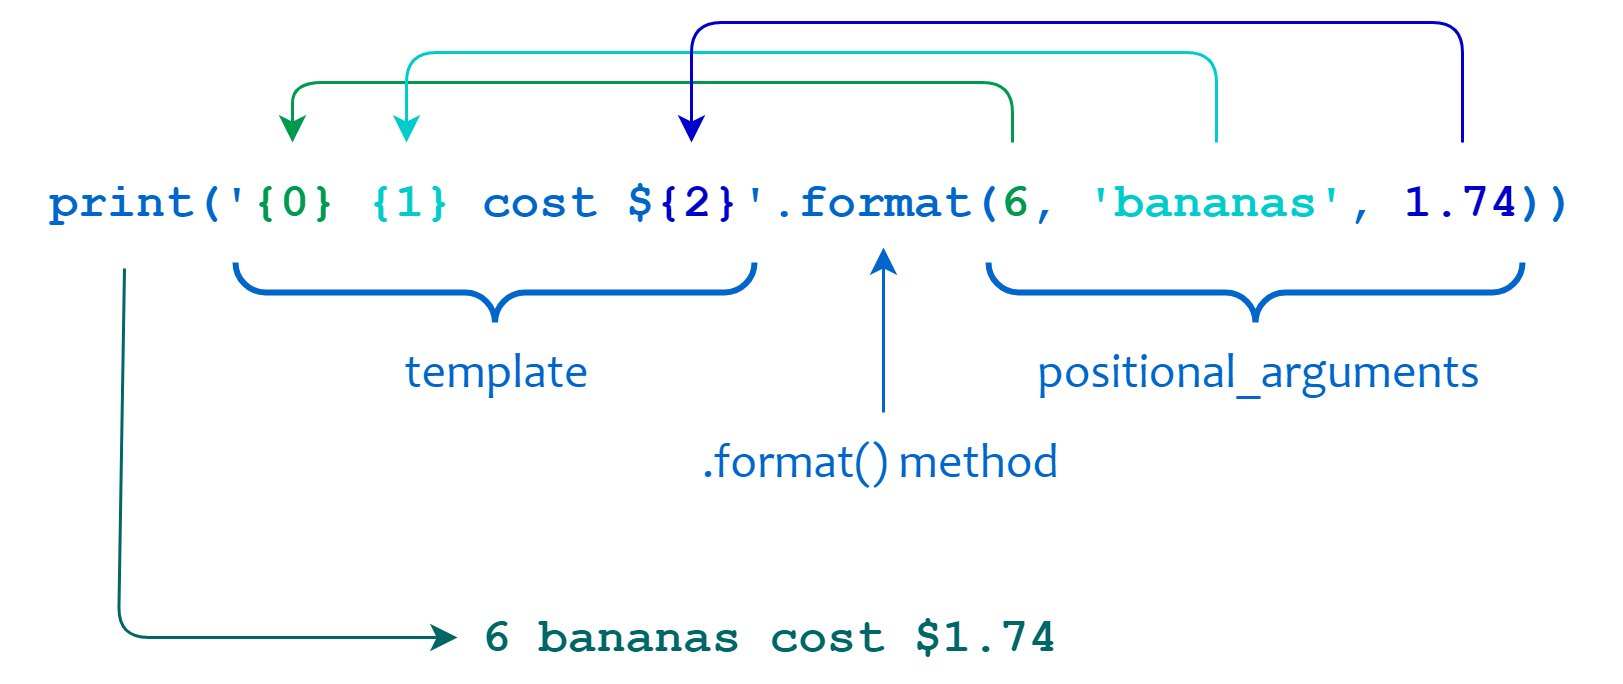
Как создавать потоки в Python

Метод 1 — «функциональный»
Для работы с потоками из модуля threading импортируем класс Thread. В начале кода пишем:
from threading import Thread
После этого нам будет доступна функция Thread() — с ней легко создавать потоки. Синтаксис такой:
variable = Thread(target=function_name, args=(arg1, arg2,))
Первый параметр target — это «целевая» функция, которая определяет поведение потока и создаётся заранее. Следом идёт список аргументов. Если судьбу аргументов (например, кто будет делимым, а кто делителем в уравнении) определяет их позиция, их записывают как args=(x,y). Если же вам нужны аргументы в виде пар «ключ-значение», используйте запись вида kwargs={‘prop’:120}.
Ради удобства отладки можно также дать новому потоку имя. Для этого среди параметров функции прописывают name=«Имя потока». По умолчанию name хранит значение null. А ещё потоки можно группировать с помощью параметра group, который по умолчанию — None.
За дело! Пусть два потока параллельно выводят каждый в свой файл заданное число строк. Для начала нам понадобится функция, которая выполнит задуманный нами сценарий. Аргументами целевой функции будут число строк и имя текстового файла для записи.
Давайте попробуем:
#coding: UTF-8
from threading import Thread

def prescript(thefile, num):
    with open(thefile, 'w') as f:
        for i in range(num):
            if num > 500:
                f.write('МногоБукв\n')
            else:
                f.write('МалоБукв\n')

thread1 = Thread(target=prescript, args=('f1.txt', 200,))
thread2 = Thread(target=prescript, args=('f2.txt', 1000,))

thread1.start()
thread2.start()
thread1.join()
thread2.join()
Что start() запускает ранее созданный поток, вы уже догадались. Метод join() останавливает поток, когда тот выполнит свои задачи. Ведь нужно закрыть открытые файлы и освободить занятые ресурсы. Это называется «Уходя, гасите свет». Завершать потоки в предсказуемый момент и явно — надёжнее, чем снаружи и неизвестно когда. Меньше риск, что вмешаются случайные факторы. В качестве параметра в скобках можно указать, на сколько секунд блокировать поток перед продолжением его работы.
Метод 2 — «классовый»
Для потока со сложным поведением обычно пишут отдельный класс, который наследуют от Thread из модуля threading. В этом случае программу действий потока прописывают в методе run() созданного класса. Ту же петрушку мы видели и в Java.
#coding: UTF-8

import threading
class MyThread(threading.Thread):
    def __init__(self, num):
        super().__init__(self, name="threddy" + num)
        self.num = num
    def run(self):
        print ("Thread ", self.num),
thread1 = MyThread("1")
thread2 = MyThread("2")
thread1.start()
thread2.start()
thread1.join()
thread2.join()
Стандартные методы работы с потоками

Чтобы управлять потоками, нужно следить, как они себя ведут. И для этого в threading есть специальные методы:
current_thread() — смотрим, какой поток вызвал функцию;
active_count() — считаем работающие в данный момент экземпляры класса Thread;
enumerate() — получаем список работающих потоков.
Ещё можно управлять потоком через методы класса:
is_alive() — спрашиваем поток: «Жив ещё, курилка?» — получаем true или false;
getName() — узнаём имя потока;
setName(any_name) — даём потоку имя;
У каждого потока, пока он работает, есть уникальный идентификационный номер, который хранится в переменной ident.
thread1.start()
print(thread1.ident)
Отсрочить операции в вызываемых потоком функциях можно с помощью таймера. В инициализаторе объектов класса Timer всего два аргумента — время ожидания в секундах и функция, которую нужно в итоге выполнить:
import threading
print ("Waiting...")
def timer_test():
    print ("The timer has done its job!")
tim = threading.Timer(5.0, timer_test)
tim.start()
Таймер можно один раз создать, а затем запускать в разных частях кода.
Потусторонние потоки
Обычно Python-приложение не завершается, пока работает хоть один его поток. Но есть особые потоки, которые не мешают закрытию программы и останавливается вместе с ней. Их называют демонами (daemons). Проверить, является ли поток демоном, можно методом isDaemon(). Если является, метод вернёт истину.
Назначить поток демоном можно при создании — через параметр “daemon=True” или аргумент в инициализаторе класса.
thread0 = Thread(target=target_func, kwargs={‘x’:10}, daemon=True)
Не поздно демонизировать и уже существующий поток методом setDaemon(daemonic).
Всё бы ничего, но это даже не верхушка айсберга, потому что прямо сейчас нас ждут великие открытия.
Creating Thread Using Threading Module
To implement a new thread using the threading module, you have to do the following −
-
Define a new subclass of the Thread class.
-
Override the __init__(self ) method to add additional arguments.
-
Then, override the run(self ) method to implement what the thread should do when started.
Once you have created the new Thread subclass, you can create an instance of it and then start a new thread by invoking the start(), which in turn calls run() method.
Example
#!/usr/bin/python

import threading
import time

exitFlag = 0

class myThread (threading.Thread):
   def __init__(self, threadID, name, counter):
      threading.Thread.__init__(self)
      self.threadID = threadID
      self.name = name
      self.counter = counter
   def run(self):
      print "Starting " + self.name
      print_time(self.name, 5, self.counter)
      print "Exiting " + self.name

def print_time(threadName, counter, delay):
   while counter:
      if exitFlag:
         threadName.exit()
      time.sleep(delay)
      print "%s: %s" % (threadName, time.ctime(time.time()))
      counter -= 1

# Create new threads
thread1 = myThread(1, "Thread-1", 1)
thread2 = myThread(2, "Thread-2", 2)

# Start new Threads
thread1.start()
thread2.start()

print "Exiting Main Thread"
When the above code is executed, it produces the following result −
Starting Thread-1
Starting Thread-2
Exiting Main Thread
Thread-1: Thu Mar 21 09:10:03 2013
Thread-1: Thu Mar 21 09:10:04 2013
Thread-2: Thu Mar 21 09:10:04 2013
Thread-1: Thu Mar 21 09:10:05 2013
Thread-1: Thu Mar 21 09:10:06 2013
Thread-2: Thu Mar 21 09:10:06 2013
Thread-1: Thu Mar 21 09:10:07 2013
Exiting Thread-1
Thread-2: Thu Mar 21 09:10:08 2013
Thread-2: Thu Mar 21 09:10:10 2013
Thread-2: Thu Mar 21 09:10:12 2013
Exiting Thread-2
Компактные блокировки с with
При множестве участков с блокировками каждый раз прописывать «захват» и «высвобождение» утомительно. Сократить код поможет конструкция с оператором with. Она использует менеджер контекста, который позволяет сначала подготовить приложение к выполнению фрагмента кода, а затем гарантированно освободить задействованные ресурсы.
Чтобы понять дальнейший материал, кратко разберем работу with, хотя это и не про блокировки. У класса, который мы собираемся использовать с with, должно быть два метода:
-
«Предисловие» — метод __enter__(). Здесь можно ставить блокировку и прописывать другие настройки;
-
«Послесловие» — метод __exit__(). Он срабатывает, когда все инструкции выполнены или работа блока прервана. Здесь можно снять блокировку и/или предусмотреть реакцию на исключения, которые могут быть выброшены.
Удача! У нашего целевого класса Lock эти два метода уже прописаны. Поэтому любой экземпляр объекта Lock можно использовать с with без дополнительных настроек.
Отредактируем функцию из примера с инкрементом. Поставим блокировку, которая сама снимется, как только управляющий поток выйдет за пределы with-блока:
def safe_plus():
    global protected_resource
    for i in range(NUM):
        with mutex:
 protected_resource += 1

# И никаких acquire-release!
Communicating With Worker QThreads
If you’re doing multithreaded programming with PyQt, then you might need to establish communication between your application’s main thread and your worker threads. This allows you to get feedback on the progress of worker threads and update the GUI accordingly, send data to your threads, allow the users to interrupt the execution, and so on.
PyQt’s signals and slots mechanism provides a robust and safe way of communicating with worker threads in a GUI application.
On the other hand, you might also need to establish communication between worker threads, such as sharing buffers of data or any other kind of resource. In this case, you need to make sure that you’re properly protecting your data and resources from concurrent access.
Структуры данных из пространства имен System.Collections.Concurrent
Напоследок хочу немного рассказать о структурах данных, которые используются для обмена информацией между потоками.
В вводится понятие производителей и потребителей, которые конкурируют за то, чтобы получить верхушку стека.
Concurrent Queue
В другой структуре данных потребители конкурируют за разные узлы. Это увеличивает пропускную способность в два раза: производители и потребители конкурируют между собой только в своей группе.
Concurrent Bag
Если вы ищете структуру данных, где нет конкуренции между производителями и потребителями, то такая структура данных называется . Она оптимизирована для низкой конкуренции. В зависимости от геометрии вашей коллекции, в каждом отдельном случае у вас будут разные виды гарантий и разная производительность. Стоит упомянуть, что такая структура данных не дает никаких гарантий в плане порядка вычислений, но она дает вам список конкурирующих потоков, где каждый поток будет работать над своей задачей.
Threading a Class
Threading a class can be quite useful as you can have many methods particular to a thread and it’s easier to keep your data in one place specific to a thread. An example of threading a class is:
In this example, I create a class that extends threading.Thread. I have created the initialisation method with an initialisation call to the super class and a run method which is what will be run when I call start(). Just like last time I loop 4 times but this time I only need to use to set up the thread variable. This will provide the output:
See how all the strings are together; this shows that they were all printed at very similar times and then all the new lines were put in. In the above examples, this did not occur as I force the newline character.
Note that if you do not need an initialisation method, you can remove it completely including the super() call.
Passing Arguments
To pass arguments, you just use the class as you would normally. For example:
In this example, I had added a parameter to the class in the initialisation method like you normally would and saved it so it can print it later. Then I simply passed a variable to the class which will be printed. This will output:
Just like last time they concatenated into one string followed by new line characters. When passing variables you need to keep the super() call as you are now using the initialisation method unless you pass it in with a different method before calling run.