Работа с элементом select из jquery
Содержание:
- Основные стили
- JavaScript
- The CSS Grouping Selector
- All CSS Simple Selectors
- JavaScript
- Methods
- CSS Advanced
- Размеры текстовой области
- Attributes
- How to style <select> tag?
- How to style tag?
- CSS Reference
- CSS Properties
- Продолжение настройки select
- Выпадающее меню
- More Examples
- Как настроить стрелку для select
- Заключение
Основные стили
Сперва сбросим параметры текста.
Свойство наследует все стили от контейнера(ов). Иногда при сбросе CSS указывают размер шрифта , но в этом нет необходимости. будет наследовать стили всех своих параметров: , , , , , и (если установлено). Ещё он добавляет высоту строки . В-общем, шрифт будет адаптироваться к изменениям, которые касаются всей страницы, либо с помощью надстроек, либо через настройки браузера/системы.
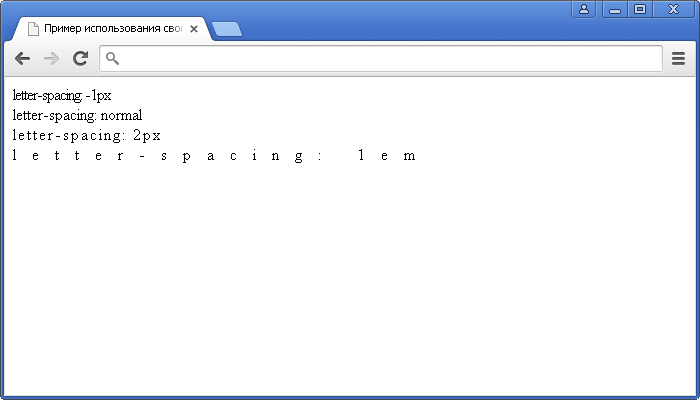
Если пользователь (или автор) изменяет параметры текста, чтобы повлиять на расстояние между буквами, это не будет касаться предустановленных для поля значений. Наследование параметров не повлияет на межбуквенное расстояние, поэтому нужно явно указать необходимость наследования значения . Это поможет соответствовать требованиям
Аналогично межбуквенному , значение для управления интервалами между словами не будет наследоваться, если это не объявить явным образом. WCAG 1.4.12 применяется и для расстояния между словами.
Обратите внимание, что в коде не устанавливается высота строки. Это значение нормально наследуется вместе с остальными параметрами шрифта в свойстве
Если обнаружится, что это не так (например, из-за явной установки высоты строки ) можно добавить , чтобы соответствовать WCAG 1.4.12.
Пример
В этом примере демонстрируется применение этого минимального набора стилей.
See this code Простой Select on x.xhtml.ru.
JavaScript
JS Array
concat()
constructor
copyWithin()
entries()
every()
fill()
filter()
find()
findIndex()
forEach()
from()
includes()
indexOf()
isArray()
join()
keys()
length
lastIndexOf()
map()
pop()
prototype
push()
reduce()
reduceRight()
reverse()
shift()
slice()
some()
sort()
splice()
toString()
unshift()
valueOf()
JS Boolean
constructor
prototype
toString()
valueOf()
JS Classes
constructor()
extends
static
super
JS Date
constructor
getDate()
getDay()
getFullYear()
getHours()
getMilliseconds()
getMinutes()
getMonth()
getSeconds()
getTime()
getTimezoneOffset()
getUTCDate()
getUTCDay()
getUTCFullYear()
getUTCHours()
getUTCMilliseconds()
getUTCMinutes()
getUTCMonth()
getUTCSeconds()
now()
parse()
prototype
setDate()
setFullYear()
setHours()
setMilliseconds()
setMinutes()
setMonth()
setSeconds()
setTime()
setUTCDate()
setUTCFullYear()
setUTCHours()
setUTCMilliseconds()
setUTCMinutes()
setUTCMonth()
setUTCSeconds()
toDateString()
toISOString()
toJSON()
toLocaleDateString()
toLocaleTimeString()
toLocaleString()
toString()
toTimeString()
toUTCString()
UTC()
valueOf()
JS Error
name
message
JS Global
decodeURI()
decodeURIComponent()
encodeURI()
encodeURIComponent()
escape()
eval()
Infinity
isFinite()
isNaN()
NaN
Number()
parseFloat()
parseInt()
String()
undefined
unescape()
JS JSON
parse()
stringify()
JS Math
abs()
acos()
acosh()
asin()
asinh()
atan()
atan2()
atanh()
cbrt()
ceil()
clz32()
cos()
cosh()
E
exp()
expm1()
floor()
fround()
LN2
LN10
log()
log10()
log1p()
log2()
LOG2E
LOG10E
max()
min()
PI
pow()
random()
round()
sign()
sin()
sqrt()
SQRT1_2
SQRT2
tan()
tanh()
trunc()
JS Number
constructor
isFinite()
isInteger()
isNaN()
isSafeInteger()
MAX_VALUE
MIN_VALUE
NEGATIVE_INFINITY
NaN
POSITIVE_INFINITY
prototype
toExponential()
toFixed()
toLocaleString()
toPrecision()
toString()
valueOf()
JS OperatorsJS RegExp
constructor
compile()
exec()
g
global
i
ignoreCase
lastIndex
m
multiline
n+
n*
n?
n{X}
n{X,Y}
n{X,}
n$
^n
?=n
?!n
source
test()
toString()
(x|y)
.
\w
\W
\d
\D
\s
\S
\b
\B
\0
\n
\f
\r
\t
\v
\xxx
\xdd
\uxxxx
JS Statements
break
class
continue
debugger
do…while
for
for…in
for…of
function
if…else
return
switch
throw
try…catch
var
while
JS String
charAt()
charCodeAt()
concat()
constructor
endsWith()
fromCharCode()
includes()
indexOf()
lastIndexOf()
length
localeCompare()
match()
prototype
repeat()
replace()
search()
slice()
split()
startsWith()
substr()
substring()
toLocaleLowerCase()
toLocaleUpperCase()
toLowerCase()
toString()
toUpperCase()
trim()
valueOf()
The CSS Grouping Selector
The grouping selector selects all the HTML elements with the same style
definitions.
Look at the following CSS code (the h1, h2, and p elements have the same
style definitions):
h1
{
text-align: center; color: red;
}h2
{
text-align: center; color: red;}p
{
text-align: center; color: red;
}
It will be better to group the selectors, to minimize the code.
To group selectors, separate each selector with a comma.
Example
In this example we have grouped the selectors from the code above:
h1, h2, p
{
text-align: center; color: red;}
All CSS Simple Selectors
| Selector | Example | Example description |
|---|---|---|
| #id | #firstname | Selects the element with id=»firstname» |
| .class | .intro | Selects all elements with class=»intro» |
| element.class | p.intro | Selects only <p> elements with class=»intro» |
| * | * | Selects all elements |
| element | p | Selects all <p> elements |
| element,element,.. | div, p | Selects all <div> elements and all <p> elements |
❮ Previous
Next ❯
JavaScript
JS Array
concat()
constructor
copyWithin()
entries()
every()
fill()
filter()
find()
findIndex()
forEach()
from()
includes()
indexOf()
isArray()
join()
keys()
length
lastIndexOf()
map()
pop()
prototype
push()
reduce()
reduceRight()
reverse()
shift()
slice()
some()
sort()
splice()
toString()
unshift()
valueOf()
JS Boolean
constructor
prototype
toString()
valueOf()
JS Classes
constructor()
extends
static
super
JS Date
constructor
getDate()
getDay()
getFullYear()
getHours()
getMilliseconds()
getMinutes()
getMonth()
getSeconds()
getTime()
getTimezoneOffset()
getUTCDate()
getUTCDay()
getUTCFullYear()
getUTCHours()
getUTCMilliseconds()
getUTCMinutes()
getUTCMonth()
getUTCSeconds()
now()
parse()
prototype
setDate()
setFullYear()
setHours()
setMilliseconds()
setMinutes()
setMonth()
setSeconds()
setTime()
setUTCDate()
setUTCFullYear()
setUTCHours()
setUTCMilliseconds()
setUTCMinutes()
setUTCMonth()
setUTCSeconds()
toDateString()
toISOString()
toJSON()
toLocaleDateString()
toLocaleTimeString()
toLocaleString()
toString()
toTimeString()
toUTCString()
UTC()
valueOf()
JS Error
name
message
JS Global
decodeURI()
decodeURIComponent()
encodeURI()
encodeURIComponent()
escape()
eval()
Infinity
isFinite()
isNaN()
NaN
Number()
parseFloat()
parseInt()
String()
undefined
unescape()
JS JSON
parse()
stringify()
JS Math
abs()
acos()
acosh()
asin()
asinh()
atan()
atan2()
atanh()
cbrt()
ceil()
clz32()
cos()
cosh()
E
exp()
expm1()
floor()
fround()
LN2
LN10
log()
log10()
log1p()
log2()
LOG2E
LOG10E
max()
min()
PI
pow()
random()
round()
sign()
sin()
sqrt()
SQRT1_2
SQRT2
tan()
tanh()
trunc()
JS Number
constructor
isFinite()
isInteger()
isNaN()
isSafeInteger()
MAX_VALUE
MIN_VALUE
NEGATIVE_INFINITY
NaN
POSITIVE_INFINITY
prototype
toExponential()
toFixed()
toLocaleString()
toPrecision()
toString()
valueOf()
JS OperatorsJS RegExp
constructor
compile()
exec()
g
global
i
ignoreCase
lastIndex
m
multiline
n+
n*
n?
n{X}
n{X,Y}
n{X,}
n$
^n
?=n
?!n
source
test()
toString()
(x|y)
.
\w
\W
\d
\D
\s
\S
\b
\B
\0
\n
\f
\r
\t
\v
\xxx
\xdd
\uxxxx
JS Statements
break
class
continue
debugger
do…while
for
for…in
for…of
function
if…else
return
switch
throw
try…catch
var
while
JS String
charAt()
charCodeAt()
concat()
constructor
endsWith()
fromCharCode()
includes()
indexOf()
lastIndexOf()
length
localeCompare()
match()
prototype
repeat()
replace()
search()
slice()
split()
startsWith()
substr()
substring()
toLocaleLowerCase()
toLocaleUpperCase()
toLowerCase()
toString()
toUpperCase()
trim()
valueOf()
Methods
| Method | Description |
|---|---|
| [index] | Returns the <option> element from the collection with the specified index (starts at 0).Note: Returns null if the index number is out of range |
| [add(option[,index])] | Adds an <option> element into the collection at the specified index. If no index is specified, it inserts the option at the end of the collection |
| item(index) | Returns the <option> element from the collection with the specified index (starts at 0).Note: Returns null if the index number is out of range |
| namedItem(id) | Returns the <option> element from the collection with the specified id.Note: Returns null if the id does not exist |
| remove(index) | Removes the <option> element with the specified index from the collection |
CSS Advanced
CSS Rounded CornersCSS Border ImagesCSS BackgroundsCSS ColorsCSS Color KeywordsCSS Gradients
Linear Gradients
Radial Gradients
CSS Shadows
Shadow Effects
Box Shadow
CSS Text EffectsCSS Web FontsCSS 2D TransformsCSS 3D TransformsCSS TransitionsCSS AnimationsCSS TooltipsCSS Style ImagesCSS Image ReflectionCSS object-fitCSS object-positionCSS ButtonsCSS PaginationCSS Multiple ColumnsCSS User InterfaceCSS Variables
The var() Function
Overriding Variables
Variables and JavaScript
Variables in Media Queries
CSS Box SizingCSS Media QueriesCSS MQ ExamplesCSS Flexbox
CSS Flexbox
CSS Flex Container
CSS Flex Items
CSS Flex Responsive
Размеры текстовой области
Если атрибуты cols или rows указаны, то их значение должно быть положительным целым числом. Значение атрибута cols (ширина) по умолчанию 20 символов, а rows (высота) 2 символа .
Обращаю Ваше внимание, что вы можете задавать значение ширины и высоты текстовой области не только в символах, но и с использованием CSS свойств width (ширина) и height (высота), в этом случае браузер будет игнорировать значение атрибутов cols и rows если они указаны. Давайте рассмотрим пример:
Давайте рассмотрим пример:
<!DOCTYPE html>
<html>
	<head>
		<title>Использование атрибута cols HTML тега <textarea></title>
	</head>
	<body>
		<form>
			<textarea cols = "10">Текстовое поле шириной 10 символов.</textarea>
			<textarea cols = "10" style = "width:200px">Текстовое поле шириной 10 символов и 200 пикселей.</textarea><br>
			<input type = "submit" cols = "submitInfo" value = "отправить">
		</form>
	</body>
</html>
В этом примере мы создали две текстовые области (элемент <textarea>), для первой и второй области атрибутом cols мы задали видимую ширину текстовой области 10 символов. Для второй текстовой области мы задали ширину элемента 200 пикселей с использованием встроенного CSS (свойство width). Как вы можете заметить, при этом браузер начинает игнорировать значение атрибута cols.
Кроме того, мы разместили внутри формы кнопку, которая служит для отправки формы (элемент <input> с типом кнопки «отправка формы»: type = «submit»).
Результат нашего примера:
Рис. 40а Использование атрибута cols HTML тега <textarea> (ширина элемента в символах и пикселях).
Attributes
| Attribute | Value | Description |
|---|---|---|
| autofocus | autofocus | Defines that the list should be focused after the page loads. |
| disabled | disabled | Indicates that the list is disabled, the user cannot interact with it. |
| form | form_id | Defines the form which the element is connected with.Is not supported in Firefox. |
| multiple: | multiple: | Indicates that more than one options can be chosen. The method of choosing more than one option depends on the operating system. In Windows, you need to keep CTRL button pressed, in Mac CMD button. |
| name | name | Defines a name for the drop down menu. It can be used to access the data of the form after it has been sent or to link to JavaScript element. |
| required | required | Indicated that the the choice of an option is required. |
| size | number | Indicated the count of the options in drop down list. If the value of «size» attribute is bigger than 1 and smaller than the total number of the options in the list, the browser will automatically add a scroll to indicate that there are more options to view. |
The <select> tag supports Global attributes and the Event Attributes.
How to style <select> tag?
Common properties to alter the visual weight/emphasis/size of text in <select> tag:
- CSS font-style property sets the style of the font. normal | italic | oblique | initial | inherit.
- CSS font-family property specifies a prioritized list of one or more font family names and/or generic family names for the selected element.
- CSS font-size property sets the size of the font.
- CSS font-weight property defines whether the font should be bold or thick.
- CSS text-transform property controls text case and capitalization.
- CSS text-decoration property specifies the decoration added to text, and is a shorthand property for text-decoration-line, text-decoration-color, text-decoration-style.
Coloring text in <select> tag:
- CSS color property describes the color of the text content and text decorations.
- CSS background-color property sets the background color of an element.
Text layout styles for <select> tag:
- CSS text-indent property specifies the indentation of the first line in a text block.
- CSS text-overflow property specifies how overflowed content that is not displayed should be signalled to the user.
- CSS white-space property specifies how white-space inside an element is handled.
- CSS word-break property specifies where the lines should be broken.
Other properties worth looking at for <select> tag:
- CSS text-shadow property adds shadow to text.
- CSS text-align-last property sets the alignment of the last line of the text.
- CSS line-height property specifies the height of a line.
- CSS letter-spacing property defines the spaces between letters/characters in a text.
- CSS word-spacing property sets the spacing between words.
How to style tag?
Common properties to alter the visual weight/emphasis/size of text in <select> tag:
- CSS font-style property sets the style of the font. normal | italic | oblique | initial | inherit.
- CSS font-family property specifies a prioritized list of one or more font family names and/or generic family names for the selected element.
- CSS font-size property sets the size of the font.
- CSS font-weight property defines whether the font should be bold or thick.
- CSS text-transform property controls text case and capitalization.
- CSS text-decoration property specifies the decoration added to text, and is a shorthand property for text-decoration-line, text-decoration-color, text-decoration-style.
Coloring text in <select> tag:
- CSS color property describes the color of the text content and text decorations.
- CSS background-color property sets the background color of an element.
Text layout styles for <select> tag:
- CSS text-indent property specifies the indentation of the first line in a text block.
- CSS text-overflow property specifies how overflowed content that is not displayed should be signalled to the user.
- CSS white-space property specifies how white-space inside an element is handled.
- CSS word-break property specifies where the lines should be broken.
Other properties worth looking at for <select> tag:
CSS Reference
CSS ReferenceCSS Browser SupportCSS SelectorsCSS FunctionsCSS Reference AuralCSS Web Safe FontsCSS Font FallbacksCSS AnimatableCSS UnitsCSS PX-EM ConverterCSS ColorsCSS Color ValuesCSS Default ValuesCSS Entities
CSS Properties
align-content
align-items
align-self
all
animation
animation-delay
animation-direction
animation-duration
animation-fill-mode
animation-iteration-count
animation-name
animation-play-state
animation-timing-function
backface-visibility
background
background-attachment
background-blend-mode
background-clip
background-color
background-image
background-origin
background-position
background-repeat
background-size
border
border-bottom
border-bottom-color
border-bottom-left-radius
border-bottom-right-radius
border-bottom-style
border-bottom-width
border-collapse
border-color
border-image
border-image-outset
border-image-repeat
border-image-slice
border-image-source
border-image-width
border-left
border-left-color
border-left-style
border-left-width
border-radius
border-right
border-right-color
border-right-style
border-right-width
border-spacing
border-style
border-top
border-top-color
border-top-left-radius
border-top-right-radius
border-top-style
border-top-width
border-width
bottom
box-decoration-break
box-shadow
box-sizing
break-after
break-before
break-inside
caption-side
caret-color
@charset
clear
clip
clip-path
color
column-count
column-fill
column-gap
column-rule
column-rule-color
column-rule-style
column-rule-width
column-span
column-width
columns
content
counter-increment
counter-reset
cursor
direction
display
empty-cells
filter
flex
flex-basis
flex-direction
flex-flow
flex-grow
flex-shrink
flex-wrap
float
font
@font-face
font-family
font-feature-settings
font-kerning
font-size
font-size-adjust
font-stretch
font-style
font-variant
font-variant-caps
font-weight
gap
grid
grid-area
grid-auto-columns
grid-auto-flow
grid-auto-rows
grid-column
grid-column-end
grid-column-gap
grid-column-start
grid-gap
grid-row
grid-row-end
grid-row-gap
grid-row-start
grid-template
grid-template-areas
grid-template-columns
grid-template-rows
hanging-punctuation
height
hyphens
@import
isolation
justify-content
@keyframes
left
letter-spacing
line-height
list-style
list-style-image
list-style-position
list-style-type
margin
margin-bottom
margin-left
margin-right
margin-top
max-height
max-width
@media
min-height
min-width
mix-blend-mode
object-fit
object-position
opacity
order
outline
outline-color
outline-offset
outline-style
outline-width
overflow
overflow-x
overflow-y
padding
padding-bottom
padding-left
padding-right
padding-top
page-break-after
page-break-before
page-break-inside
perspective
perspective-origin
pointer-events
position
quotes
resize
right
row-gap
scroll-behavior
tab-size
table-layout
text-align
text-align-last
text-decoration
text-decoration-color
text-decoration-line
text-decoration-style
text-indent
text-justify
text-overflow
text-shadow
text-transform
top
transform
transform-origin
transform-style
transition
transition-delay
transition-duration
transition-property
transition-timing-function
unicode-bidi
user-select
vertical-align
visibility
white-space
width
word-break
word-spacing
word-wrap
writing-mode
z-index
Продолжение настройки select
Стоит обратить внимание, что интервалы у текста не очень хороши. Потенциально можно сделать их более привлекательными, удобными и доступными для пользователей с помощью всего нескольких дополнительных стилей
Например, можно настроить и . Эти два свойства расширяют базовые стили, описанные выше, чтобы сделать текстовые поля более удобными.
Изменение значений CSS-свойств для рамки поля сопряжено с риском. Согласно WCAG (), если для элемента формы не вносить изменений в стили по умолчанию, то это никак не повлияет на контрастность. Тем не менее, с помощью будет установлена толщина рамки на основе размера шрифта. Теперь рамка поля выбора будет масштабироваться вместе с текстом. Заодно она становится толще, чем используется по умолчанию в большинстве браузеров.
Здесь умышленно не установлен цвет рамки, чтобы позволить браузеру сделать это самостоятельно. Конечно, если фон страницы не белый, можно изменить цвет рамки.
Трогать для не обязательно. Однако, содержимое поля будет немного легче читать и использовать, если немного его настроить. Это поможет сделать отступы в ближе к аналогичным в и , если их тоже предстоит настраивать.
Выпадающее меню
Меню, которое мы будем создавать, будет иметь основные навигационные ссылки, расположенные в горизонтальной панели навигации, и подпункты, которые будут отображаться только после наведения курсора мыши на тот пункт меню, к которому эти подпункты относятся.
Сначала нам нужно создать HTML-структуру нашего меню. Основные навигационные ссылки мы поместим в маркированный список:
<ul id="navbar">
  <li><a href="#">Главная</a></li>
  <li><a href="#">Новости</a></li>
  <li><a href="#">Контакты</a></li>
  <li><a href="#">О нас</a></li>
</ul>
Подпункты мы разместим в отдельном списке, вложив его в элемент <li>, который содержит родительскую ссылку относительно подпунктов. Теперь мы имеем четкую структуру нашей будущей панели навигации:
<ul id="navbar">
  <li><a href="#">Главная</a></li>
  <li><a href="#">Новости</a></li>
  <li><a href="#">Контакты</a>
    <ul>
      <li><a href="#">Адрес</a></li>
      <li><a href="#">Телефон</a></li>
      <li><a href="#">Email</a></li>
    </ul>
  </li>
  <li><a href="#">О нас</a></li>
</ul>
Попробовать »
Теперь приступим к написанию CSS кода. Для начала необходимо скрыть список с подпунктами с помощью объявления display: none;, чтобы они не отображались на веб-странице все время. Для отображения подпунктов нам нужно чтобы при наведении на элемент <li> список снова был преобразован в блочный элемент:
#navbar ul { display: none; }
#navbar li:hover ul { display: block; }
Убираем у обоих списков отступы и маркеры, установленные по умолчанию. Элементы списка с навигационными ссылками делаем плавающими, формируя горизонтальное меню, но для элементов списка, содержащих подпункты задаем float: none;, чтобы они отображались друг под другом.
#navbar, #navbar ul {
  margin: 0;
  padding: 0;
  list-style-type: none;
}
#navbar li { float: left; }
#navbar ul li { float: none; }
Затем нам нужно сделать так, чтобы наше выпадающее подменю не смещало контент, расположенный под панелью навигации, вниз. Для этого мы зададим пунктам списка position: relative;, а списку, содержащему подпункты position: absolute; и добавим свойство top со значением 100%, чтобы абсолютно позиционированное подменю отображалось точно под ссылкой.
#navbar ul {
  display: none;
  position: absolute;
  top: 100%;
}
#navbar li {
  float: left;
  position: relative;
}
#navbar { height: 30px; }
Попробовать »
Высота для родительского списка была добавлена специально, так как браузеры не учитывают в качестве содержимого элемента плавающий контент, то без добавления высоты наш список будет проигнорирован браузером и контент, следующий за списком, будет обтекать наше меню.
Теперь нам осталось стилизовать оба наших списка и выпадающее меню будет готово:
#navbar ul {
  display: none;
  background-color: #f90;
  position: absolute;
  top: 100%;
}
#navbar li:hover ul { display: block; }
#navbar, #navbar ul {
  margin: 0;
  padding: 0;
  list-style-type: none;
}
#navbar {
  height: 30px;
  background-color: #666;
  padding-left: 25px;
  min-width: 470px;
}
#navbar li {
  float: left;
  position: relative;
  height: 100%;
}
#navbar li a {
  display: block;
  padding: 6px;
  width: 100px;
  color: #fff;
  text-decoration: none;
  text-align: center;
}
#navbar ul li { float: none; }
#navbar li:hover { background-color: #f90; }
#navbar ul li:hover { background-color: #666; }
Попробовать »
More Examples
Example
Get the text of the first option (index 0) in a drop-down list:
var x = document.getElementById(«mySelect»).options.text;
The result of x will be:
Apple
Example
item(index)
Get the text of the first option (index 0) in a drop-down list:
var x = document.getElementById(«mySelect»).options.item(0).text;
The result of x will be:
Apple
Example
namedItem(id)
Get the text of the option with id=»orange» in a drop-down list:
var x = document.getElementById(«mySelect»).options.namedItem(«orange»).text;
The result of x will be:
Orange
Example
Add a «Kiwi» option at index position «1» in a drop-down list:
var x = document.getElementById(«mySelect»);var c = document.createElement(«option»);
c.text = «Kiwi»;x.options.add(c, 1);
Example
Remove the option with index «1» from a drop-down list:
var x = document.getElementById(«mySelect»);x.options.remove(1);
Example
Loop through all options in a drop-down list, and output the text of each
option:
var x = document.getElementById(«mySelect»);var txt = «»;
var i;for (i = 0; i < x.length; i++) { txt = txt + x.options.text + «<br>»;
}
The result of txt will be:
Apple
Orange
PineappleBanana
Example
Choose an option in the drop-down list and output the text of the selected option in an
element with id=»demo»:
var x = document.getElementById(«mySelect»);var i = x.selectedIndex;
document.getElementById(«demo»).innerHTML = x.options.text;
The result could be:
Banana
Example
Change the options in a drop-down list depending on the selected option in
another drop-down list:
var carsAndModels = {};carsAndModels = ;
carsAndModels = ;carsAndModels = ;function ChangeCarList() {
var carList = document.getElementById(«car»); var modelList = document.getElementById(«carmodel»);
var selCar = carList.options.value; while (modelList.options.length) { modelList.remove(0);
} var cars = carsAndModels;
if (cars) { var i; for (i = 0; i < cars.length; i++) {
var car = new Option(cars, i); modelList.options.add(car);
} }}
❮ Select Object
Как настроить стрелку для select
Часто, стрелка (индикатор того, что это выпадашка — поле выбора значений) по умолчанию плохо вписывается в дизайн и её лучше заменить на что-нибудь более подходящее. Вот необходимый минимум стилей, с помощью которых можно заменить стрелку у :
Здесь удаляются стили, устанавливаемые браузером, освобождается место для графической стрелки, а затем новая картинка стрелки вставляется в качестве фона. Это должно применяться только в том случае, если обычный и предназначен для выбора одиночного значения, а не нескольких ().
See this code Select с измененной стрелкой on x.xhtml.ru.
Этот пример демонстрирует замену стрелки по умолчанию элементу .
Заключение
Пример стилизованного в разных состояниях с сохранением WCAG-доступности.
See this code Select Menus on x.xhtml.ru.
Когда речь идет о стилизации полей формы, нужно обратить внимание на минимальный набор стилей, который понадобится, чтобы обеспечить соответствие общему дизайну и поддержку состояний, которые перечислены выше. Похожие публикации, посвященные стилизации HTML-элемента : Select Like It’s 2019 и Custom Select Styles with Pure CSS немного отличаются подходами, но заслуживают не меньшего внимания
Может быть эти варианты даже лучше соответствуют вашим целям и требованиям
Похожие публикации, посвященные стилизации HTML-элемента : Select Like It’s 2019 и Custom Select Styles with Pure CSS немного отличаются подходами, но заслуживают не меньшего внимания. Может быть эти варианты даже лучше соответствуют вашим целям и требованиям.